This month our What's Baking? theme is to bake something from our heritage. Amanda of Our Italian Kitchen was inspired by St. Patrick's Day when she chose our theme.
I love this idea, and I thought quite a bit about what I might bake. I thought about a German apple streudel, or a Norwegian cardamom bread (and then I made some Norwegian rice pudding after browsing a bit). But to me, baking from your heritage means more of baking something you grew up with than baking something traditional in the country your ancestors came from. While my dad grew up with some traditional Norwegian dishes, I didn't. I grew up with traditional New England fare.
So I'm going with my Yankee heritage. My entire mother's mother's side of the family has been in Connecticut since the 1600s, so I think that counts.
I made Joe Frogger cookies. These cookies are very humble, totally not fancy. They get dry and hard, and that's how I like them- they're perfect for dunking in coffee. They're a good cookie when you're starving and can't wait for dinner but don't want anything really rich or sweet. They kind of remind me of Kedem biscuits, in that they're just a nice, plain cookie to munch on. You can buy them at the Publick House in Sturbridge, MA, and their recipe is actually what I used. I grew up eating my mother's molasses cookies, which are almost the same as Joe Froggers, but I don't have her recipe. Legend has it that mom's cookies are from a recipe that's been in our family since the 1600s. She's explained to me that back then, our people were very frugal, so our family's recipes had either fat or eggs, but never both. The frugality makes sense to me, but our people were farmers, so I've never really understood not being able to use butter and eggs. But our people were tobacco farmers (did you know tobacco is a huge industry in the Connecticut River Valley? We grow shade tobacco, which is used as the outer layer on cigars) so while I'm pretty sure they had chickens and fresh eggs, maybe they didn't have such easy access to dairy products. And the Joe Frogger recipe I've used also has no eggs... so maybe mom's right.
Joe Frogger Cookies
from The Book of New New England Cookery, by Judith and Evan Jones, given to me by a friend several years ago
1/2 cup shortening
1 cup sugar
1t salt
1 cup dark molasses
6T water
2T rum
4.5 cups flour (I added 1/2 cup)
1t baking soda
1 and 1/2t ginger
1/2t cloves
1/2t nutmeg
1/4t allspice
Cream the shortening and sugar together, then stir in the salt, molasses, water and rum (it'll look kind of curdled, this is fine.) In a separate bowl, mix/sift the flour, baking soda and spices together, then stir it into the shortening/sugar mixture.
Chill the dough thoroughly (this is important, it's pretty soft). Generously flour a board and roll out the dough to 1/4inch thick, then cut into the traditional large circles. Bake at 375F for 12-15 minutes.
These cookies become pretty dry and hard after a couple days, and then they're perfect for dunking in coffee or tea.
Tuesday, March 29, 2011
Monday, March 21, 2011
Funny-looking Bread
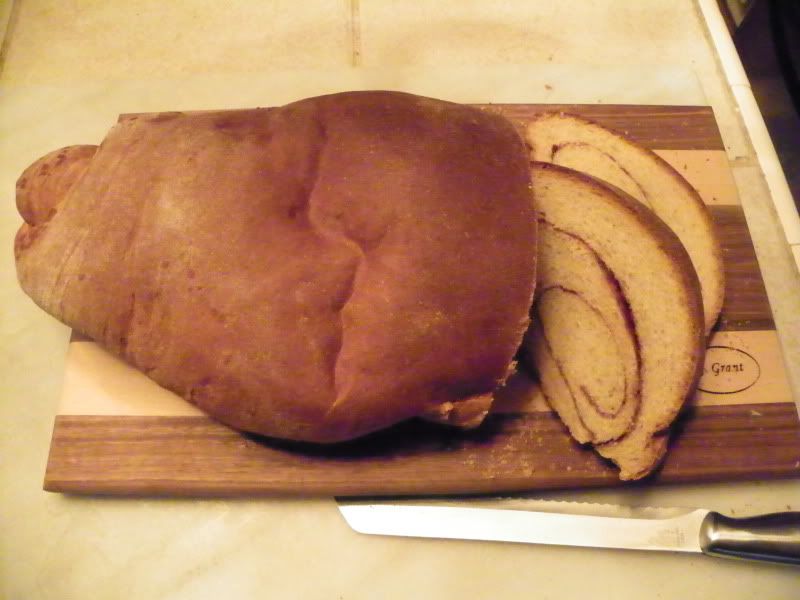
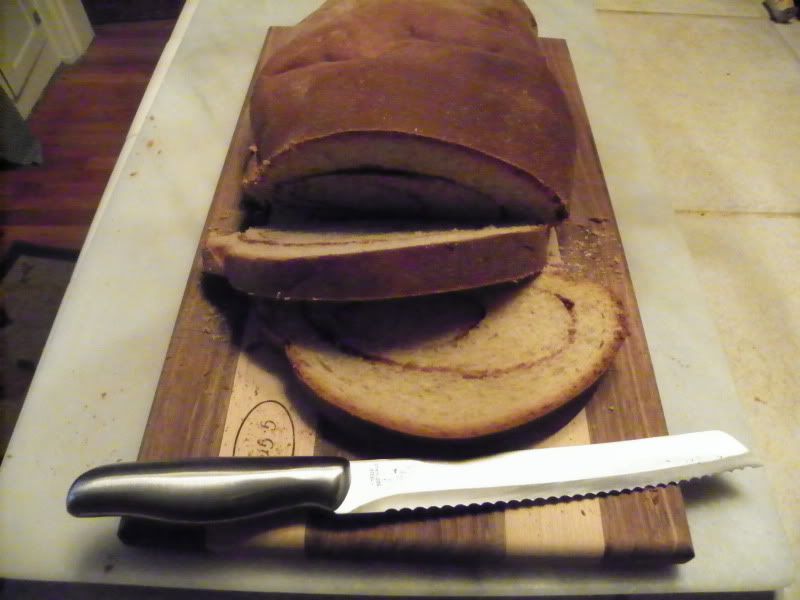
I had the urge bake bread last week- and we happened to be running low on bread, anyway, so the timing was right. I didn't search for a recipe, I just made it up as I went. And as luck would have it (maybe karma owes me after being indisposed for 3 weeks- first my fall, then a horrible cold-turned-sinus infection), this bread turned out perfect. It was light and a little chewy, not dry at all, and had a great flavor. However, when I pulled it out of the oven, it looked like a manatee. It was pretty bizarre. I'm just sorry I was unable to get a picture before we'd already eaten half the loaf.
Cinnamon Swirl Bread
a wamozart12 original
2 cups of warm water (about 95-100F)
1 heaping T active dry yeast
1/4 cup olive oil
8T brown sugar, divided
2 cups whole wheat flour
1/2-1t salt
3-3.5 cups all purpose flour
2T butter, melted
1/4 cup brown sugar
3t cinnamon
In your large bread bowl (stand mixer bowl for me), dissolve 2T brown sugar in the water and sprinkle the yeast over. Let that sit for 10-15 min for the yeast to wake up.
Whisk in the remaining 6T brown sugar and the oil. Add the whole wheat flour, one cup at a time, then the salt. Stir in 2 cups of the all purpose flour, then switch to your dough hook and add one more cup of flour. Start kneading and add more flour if you need it. The dough should be a little sticky, not dry at all. Knead for about 10 minutes in your stand mixer or slightly less time by hand. Cover the bowl with a clean towel or plastic wrap and let rise in a warm place, until doubled (about 2hrs).
Punch down the dough and knead for a few seconds on a floured board. Roll it out to a large rectangle. Brush the melted butter over the dough. Whisk the brown sugar and cinnamon together and spread evenly over the butter. (I basically did what Alton does for his cinnamon rolls for this part, only my rectangle was wider and not as long). Roll up the dough, rolling along the long side. Place on a baking sheet and cover with a clean towel/plastic wrap and let rise for another hour.
Preheat oven to 400F. Bake bread (you can do an egg wash if you like, I didn't) for 30 min at 400F, then reduce heat to 350F and bake another 20 minutes. Cool at least 15 minutes before eating, if you can wait that long!
This is delicious fresh from the oven, toasted with a little butter, and as french toast. The loaf is huge but it hasn't lasted us very long!
Friday, March 18, 2011
Baby Shower Card Tutorial
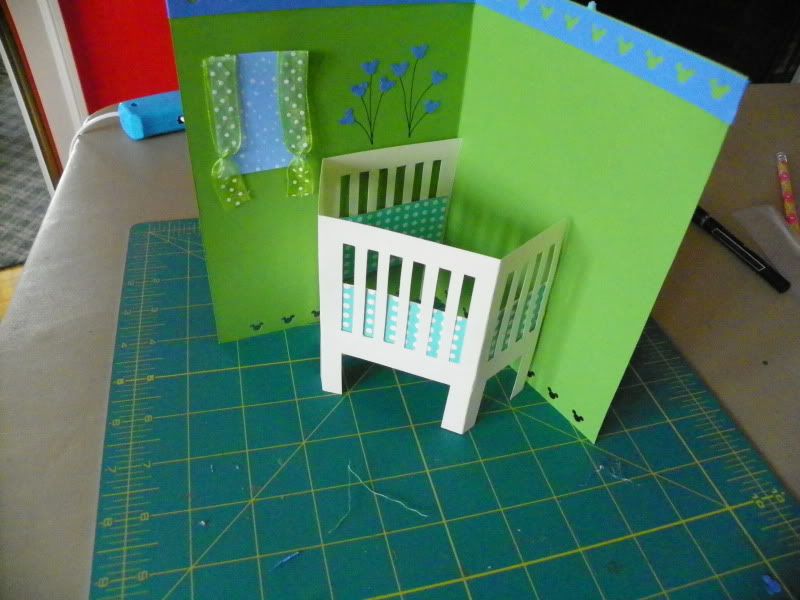
I made this awesome baby shower card for my friend for her shower in January, and I had a lot of requests to show how I did it! I was inspired by a pop-up crib card on Etsy, so I figured out how to do it myself.
Materials:
White cardstock (for the crib, or whatever color you want)
2 pieces of paper/cardstock for the card itself and the inner lining part
Small square/rectangle of paper for the window
Ribbons for the curtains
Craft knife (I have a Martha Stewart one from Michael's)
Cutting mat (I use my fabric cutting mats)
Sharp pencil
Low-temp glue gun (you can use double sided tape, Elmer's or a glue stick, but believe me, this is much easier. They're only a few dollars from Joann's, etc, and work well with paper. I don't recommend a hot glue gun for paper)
For decorations in the room: paper punches, ability to draw, etc, whatever you'd like.
First, the crib.
I'll see if I can figure out how to make a downloadable/printable pdf template, but for now...
The crib is 4in x 9in. Eventually it'll be a 4-sided structure with legs. All of the legs are 1.25 in long. The end legs are single legs (since it folds around) and are 3/8in wide each, the other 3 legs are double legs and are 3/4 in wide. When you fold it, it'll make sense.
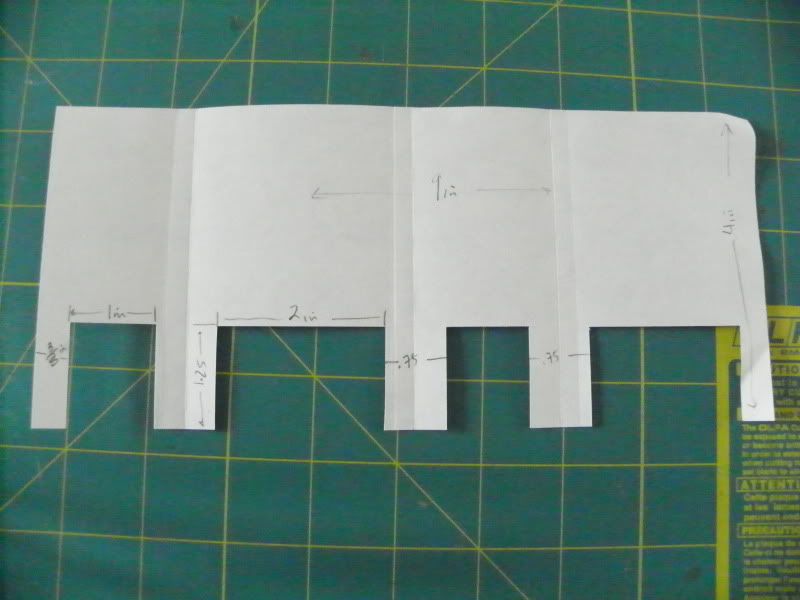
(if you click on the above photo, it'll enlarge and you can see my hand-written dimensions)
Trace all that out with a sharp pencil using very light lines, (same with this one, click to enlarge and be able to read my handwriting)
and then using a ruler and a craft knife, cut it out.
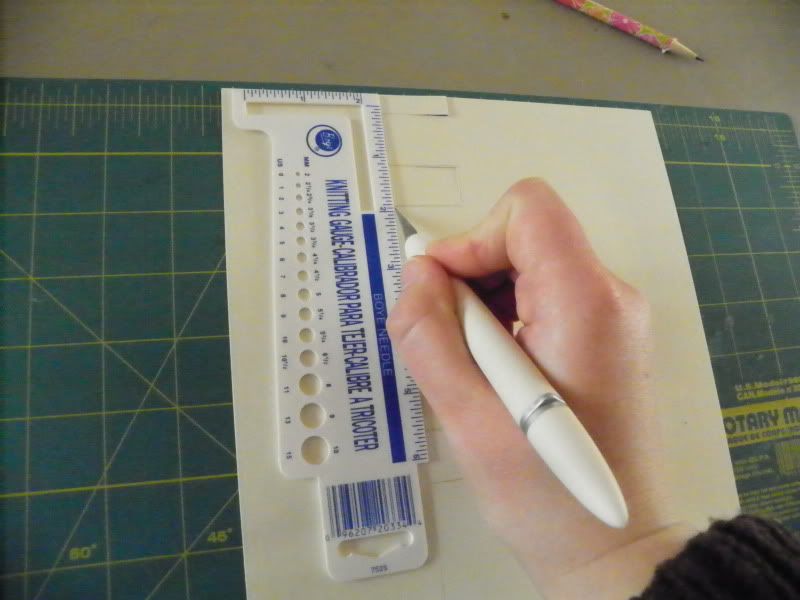
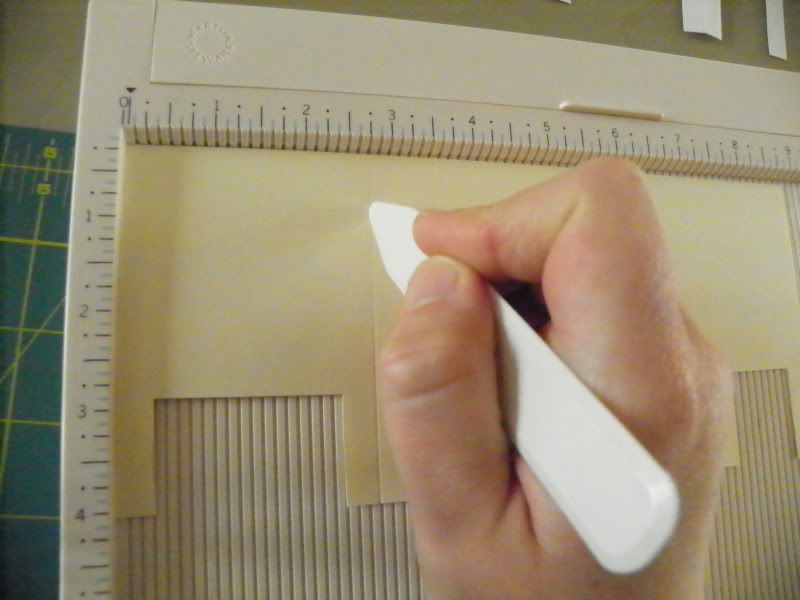
Now make the creases. I like my scoring board (Martha Stewart from Michael's), but before I had this, I liked to trace the line on the paper, butt a thin ruler up against that, and then bring the paper up against the ruler and then fold it over and slide the ruler down the fold to make it a really good crease. This works pretty well and reduces the special tools you need.
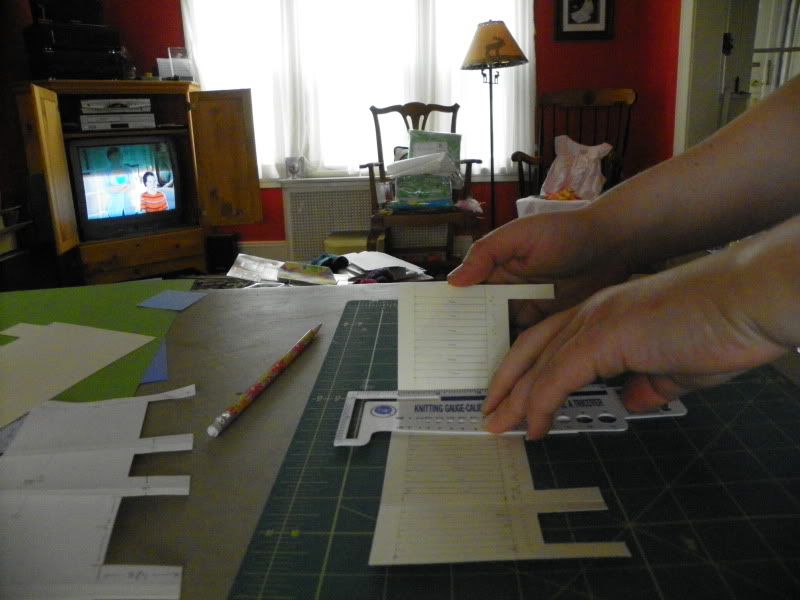
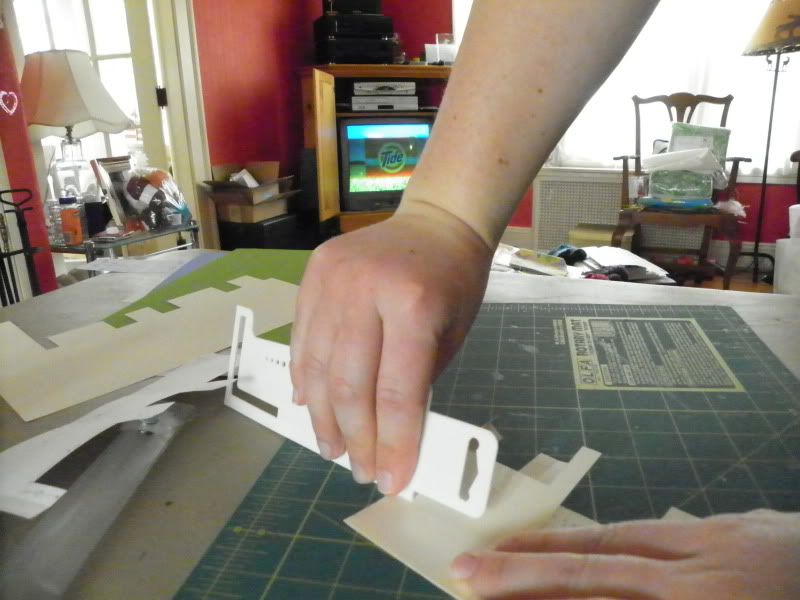
So the crib is cut out and folded. Is it folded correctly? I like the long edge to be on the left-hand side of the card, and you want the edges of the crib to meet in the fold of the card itself (otherwise it won't hold together), so refold if you need to.
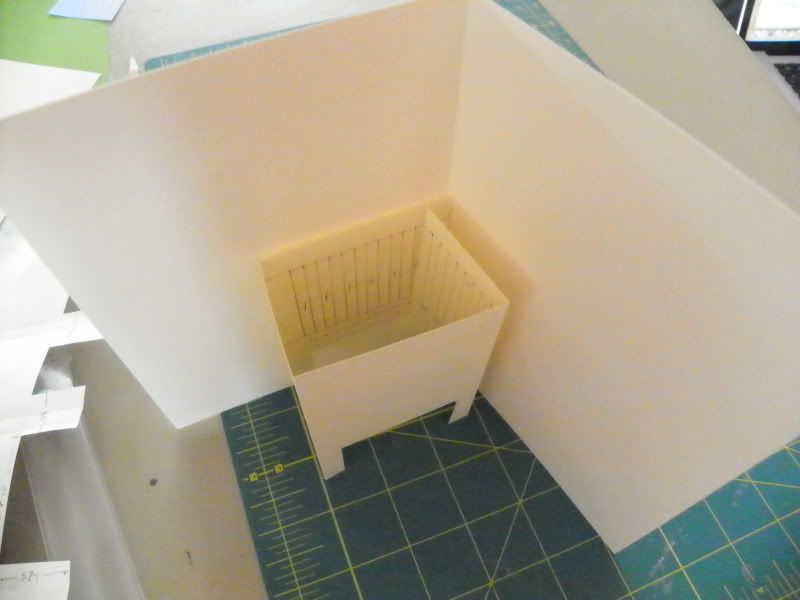
Once you're sure it's folded the right way, flip it over and trace on the lines to cut out the bars of the crib. I like to trace on the lines so I know I'm cutting straight lines.
The bars are 3/16in thick and are 1/2 up from the bottom of the crib (the bottom not counting the legs) and 3/8 in down from the top.
On the short sides, I start 3/16 in from the edge and begin to trace lines every 3/16 in.
On the long sides, I start 5/16 in in from the edge.
Every other space between the lines is cut away, starting at the first block and ending at the last block. Mark the ones to be removed so you remember.
Now cut all the vertical bar lines you just drew with your craft knife.
Now remove every other block by cutting on the horiztontal lines at the top and bottom. Remember to only cut the blocks that you marked! Otherwise you'll end up with big holes instead of bars. This is why I mark the ones to be removed.
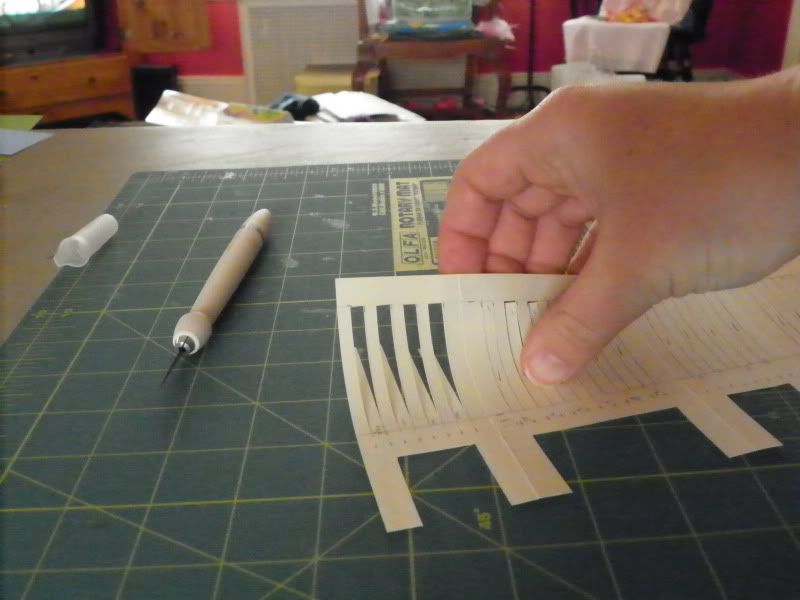
Ok, now the hard part's done, and we can have fun with decorating.
I like to add some bedding inside the crib.
My bedding is 1.5in wide by 9in long. Remember how you'll view the crib once it's glued in, though. You'll be able to see all of the inside and half of the outside (since 2 sides will be glued to the card). So 4.5 in of that bedding strip should be two-sided. Either use 2-sided paper or glue a 4.5x1.5 in strip back-to-back with one half of the 9x1.5in strip. Score these to fit snugly inside the crib before you glue them (a glue stick is sufficient here, or you can use the lo-temp glue gun).
When scoring, line everything up so you score in the correct dimensions. Also, where the edges of the bedding meets isn't as important as for the crib, since the bedding will be glued to the crib anyway- but it's still easier to have the edges meet at the corner of the card.
Now attach the bedding to the crib! Use the glue gun for this step. Clint taught me a good trick for this sort of thing: line up the folds to get everything put together straight, then fold down one flap and glue, then the next flap, etc. Things stay together better this way than if you were to just glue the whole crib and try to plop down the bedding on top and have it line up perfectly. Fold each crease again after you glue each of the four sections, to make sure it's still lined up right.
The crib will be pretty stiff after you've glued the bedding on, just refold.
Before gluing the crib to the card, decorate the card.
The paper for the card is 10x7in, scored down the middle (at 5in) (or just buy a 5x7 card). You could make a smaller card, but you'll need to reduce the size of the crib.
I've added a window to the left-hand side of the card (1.5x2in rectangle with some ribbon lo-temp glue gun glued to the rectangle, folded over the top and glued to secure, then tied with thread near the bottom), 2 bunches of mickey balloons (mickey punches glued down with regular glue and black ink lines). On the first version of this card, I made a banner of penants out of equilateral triangles and a lo-temp glue gun glued-on string. You can really do anything you'd like, ask the mom-to-be how they've decorated the nursery and use the actual room as inspiration.
To attach the crib to the card, stand up the inner lining card and nestle the crib in. Hold the the crib in place and lay the card down. Now flatten the card, still holding that left-hand inner section that'll be glued, and then hold down the next section to the left, lifting the section to be glued slightly. And glue the crib (or the edge of the card, either way). Lay the crib down and press while the glue sets- this is why I'm using the lo-temp glue gun, because it'll set in a few seconds and you don't have to devise some elaborate way to secure the pieces together while they dry and wait hours for it to be completely dry and ready for the next step.
Ok, now glue the other section of the crib to be glued to the card,
line up the card and press the two together. Voila!
The last step it to glue the inner card to the outer.
This is totally optional, you can just use a card. But if you want to use a decorative punch outn the inner card and have another color show through, you will need the outer card. I like using one cardstock and one paper for the pair, either one can be the inner or outer. If you use 2 pieces of cardstock, it gets pretty heavy- not a problem, but be aware of that. And you may want to trim off any excess outer/inner cards so they line up exactly.
And then decorate the front of the card however you'd like. I went simple with this one and just used a stripe of cute blue prams.
There you have it, how to make your own pop-up crib card. It's not a speedy process, but once you figure it out you can get an assembly line going and it won't take too long. I'll let you know how long my third card takes, after I've figured out all the measurements and don't have to stop to photograph the steps and blog each step as I go.
Materials:
White cardstock (for the crib, or whatever color you want)
2 pieces of paper/cardstock for the card itself and the inner lining part
Small square/rectangle of paper for the window
Ribbons for the curtains
Craft knife (I have a Martha Stewart one from Michael's)
Cutting mat (I use my fabric cutting mats)
Sharp pencil
Low-temp glue gun (you can use double sided tape, Elmer's or a glue stick, but believe me, this is much easier. They're only a few dollars from Joann's, etc, and work well with paper. I don't recommend a hot glue gun for paper)
For decorations in the room: paper punches, ability to draw, etc, whatever you'd like.
First, the crib.
I'll see if I can figure out how to make a downloadable/printable pdf template, but for now...
The crib is 4in x 9in. Eventually it'll be a 4-sided structure with legs. All of the legs are 1.25 in long. The end legs are single legs (since it folds around) and are 3/8in wide each, the other 3 legs are double legs and are 3/4 in wide. When you fold it, it'll make sense.
(if you click on the above photo, it'll enlarge and you can see my hand-written dimensions)
Trace all that out with a sharp pencil using very light lines, (same with this one, click to enlarge and be able to read my handwriting)
and then using a ruler and a craft knife, cut it out.
Now make the creases. I like my scoring board (Martha Stewart from Michael's), but before I had this, I liked to trace the line on the paper, butt a thin ruler up against that, and then bring the paper up against the ruler and then fold it over and slide the ruler down the fold to make it a really good crease. This works pretty well and reduces the special tools you need.
So the crib is cut out and folded. Is it folded correctly? I like the long edge to be on the left-hand side of the card, and you want the edges of the crib to meet in the fold of the card itself (otherwise it won't hold together), so refold if you need to.
Once you're sure it's folded the right way, flip it over and trace on the lines to cut out the bars of the crib. I like to trace on the lines so I know I'm cutting straight lines.
The bars are 3/16in thick and are 1/2 up from the bottom of the crib (the bottom not counting the legs) and 3/8 in down from the top.
On the short sides, I start 3/16 in from the edge and begin to trace lines every 3/16 in.
On the long sides, I start 5/16 in in from the edge.
Every other space between the lines is cut away, starting at the first block and ending at the last block. Mark the ones to be removed so you remember.
Now cut all the vertical bar lines you just drew with your craft knife.
Now remove every other block by cutting on the horiztontal lines at the top and bottom. Remember to only cut the blocks that you marked! Otherwise you'll end up with big holes instead of bars. This is why I mark the ones to be removed.
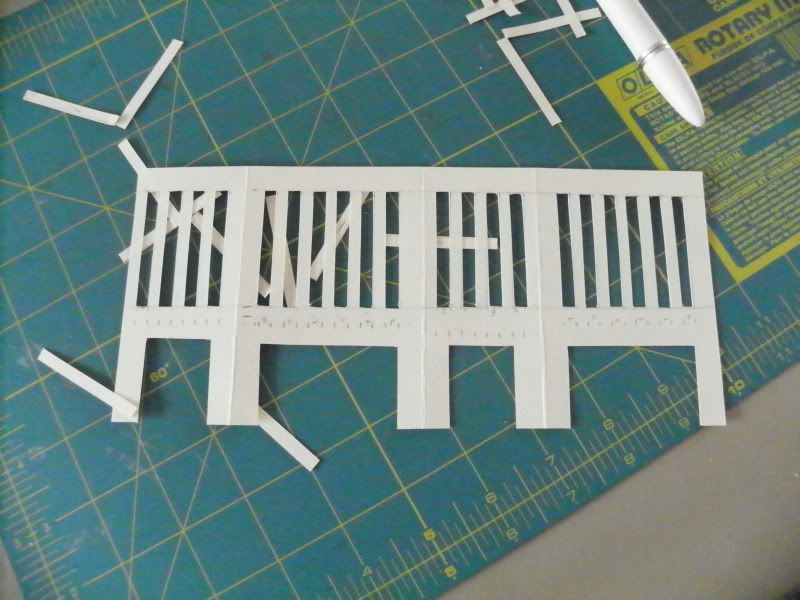
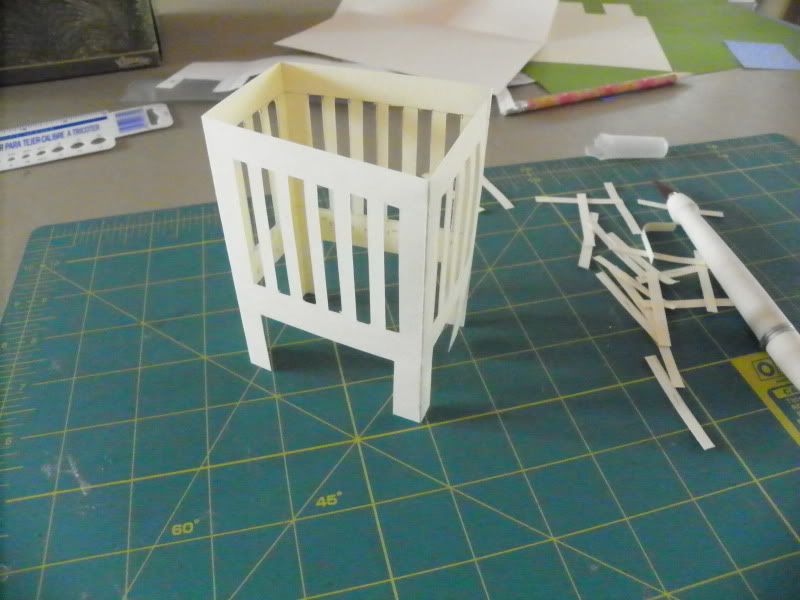
Ok, now the hard part's done, and we can have fun with decorating.
I like to add some bedding inside the crib.
My bedding is 1.5in wide by 9in long. Remember how you'll view the crib once it's glued in, though. You'll be able to see all of the inside and half of the outside (since 2 sides will be glued to the card). So 4.5 in of that bedding strip should be two-sided. Either use 2-sided paper or glue a 4.5x1.5 in strip back-to-back with one half of the 9x1.5in strip. Score these to fit snugly inside the crib before you glue them (a glue stick is sufficient here, or you can use the lo-temp glue gun).
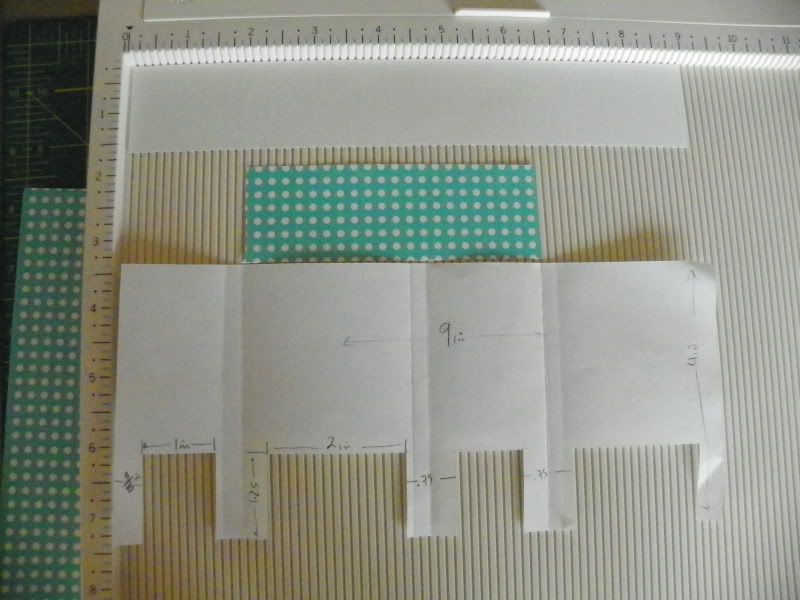
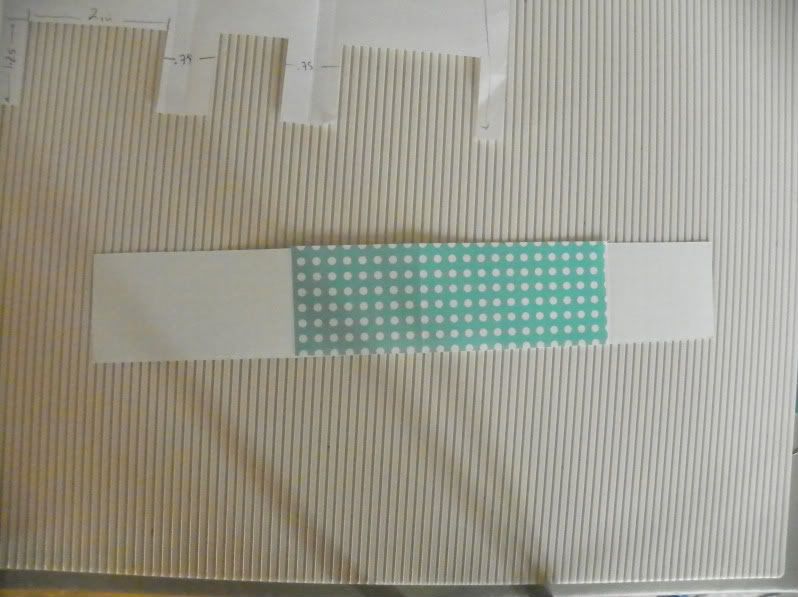
When scoring, line everything up so you score in the correct dimensions. Also, where the edges of the bedding meets isn't as important as for the crib, since the bedding will be glued to the crib anyway- but it's still easier to have the edges meet at the corner of the card.
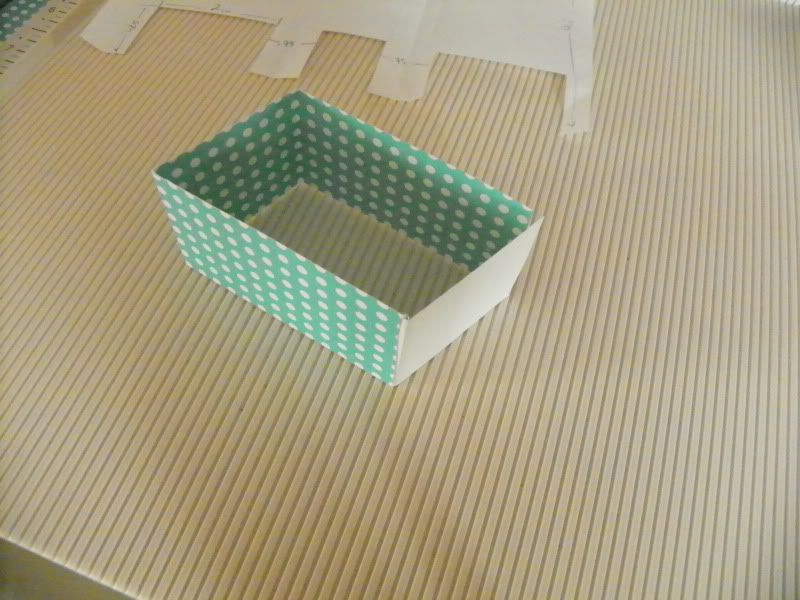
Now attach the bedding to the crib! Use the glue gun for this step. Clint taught me a good trick for this sort of thing: line up the folds to get everything put together straight, then fold down one flap and glue, then the next flap, etc. Things stay together better this way than if you were to just glue the whole crib and try to plop down the bedding on top and have it line up perfectly. Fold each crease again after you glue each of the four sections, to make sure it's still lined up right.
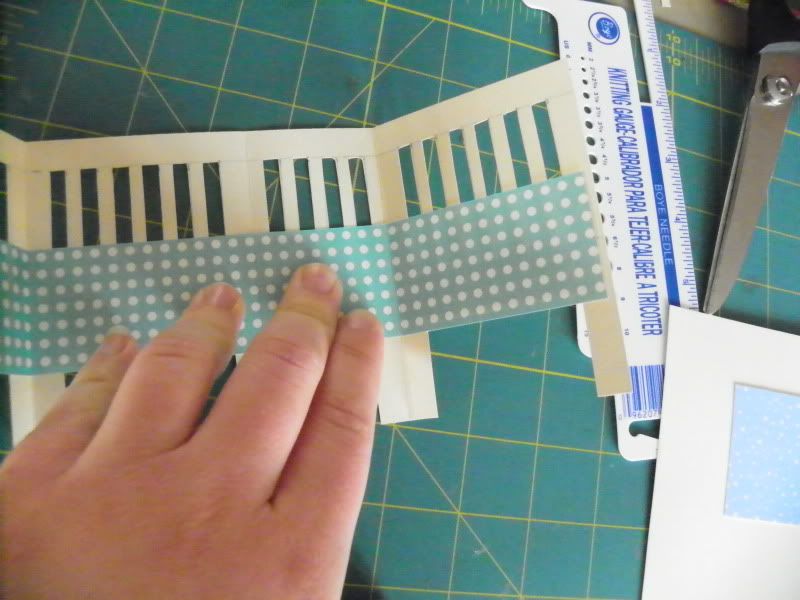
The crib will be pretty stiff after you've glued the bedding on, just refold.
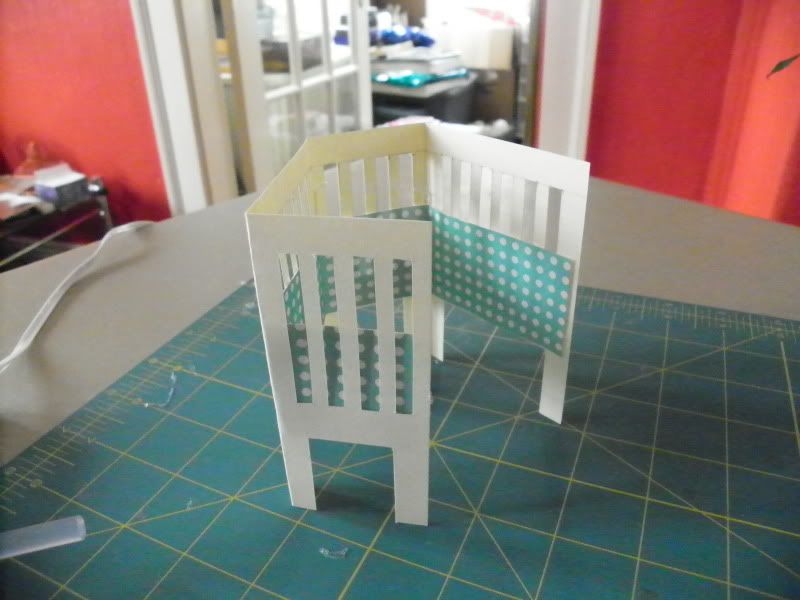
Before gluing the crib to the card, decorate the card.
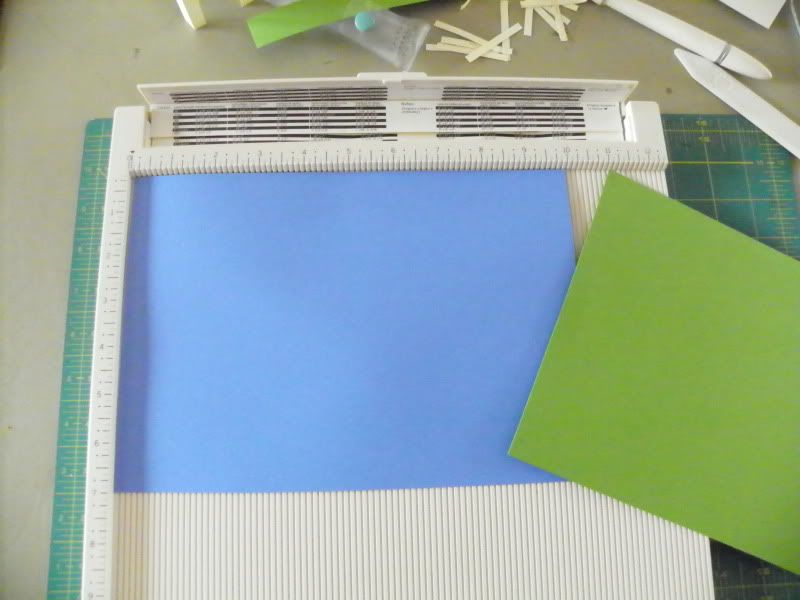
The paper for the card is 10x7in, scored down the middle (at 5in) (or just buy a 5x7 card). You could make a smaller card, but you'll need to reduce the size of the crib.
I've added a window to the left-hand side of the card (1.5x2in rectangle with some ribbon lo-temp glue gun glued to the rectangle, folded over the top and glued to secure, then tied with thread near the bottom), 2 bunches of mickey balloons (mickey punches glued down with regular glue and black ink lines). On the first version of this card, I made a banner of penants out of equilateral triangles and a lo-temp glue gun glued-on string. You can really do anything you'd like, ask the mom-to-be how they've decorated the nursery and use the actual room as inspiration.
To attach the crib to the card, stand up the inner lining card and nestle the crib in. Hold the the crib in place and lay the card down. Now flatten the card, still holding that left-hand inner section that'll be glued, and then hold down the next section to the left, lifting the section to be glued slightly. And glue the crib (or the edge of the card, either way). Lay the crib down and press while the glue sets- this is why I'm using the lo-temp glue gun, because it'll set in a few seconds and you don't have to devise some elaborate way to secure the pieces together while they dry and wait hours for it to be completely dry and ready for the next step.
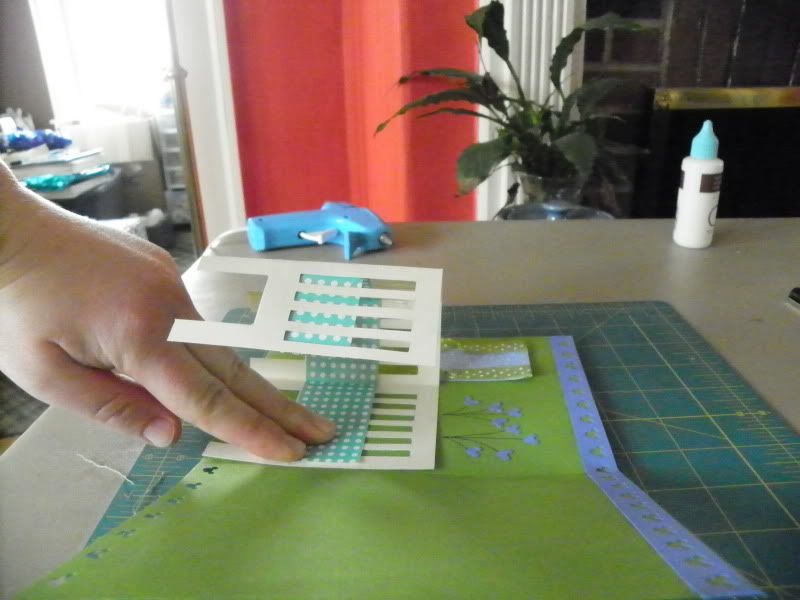
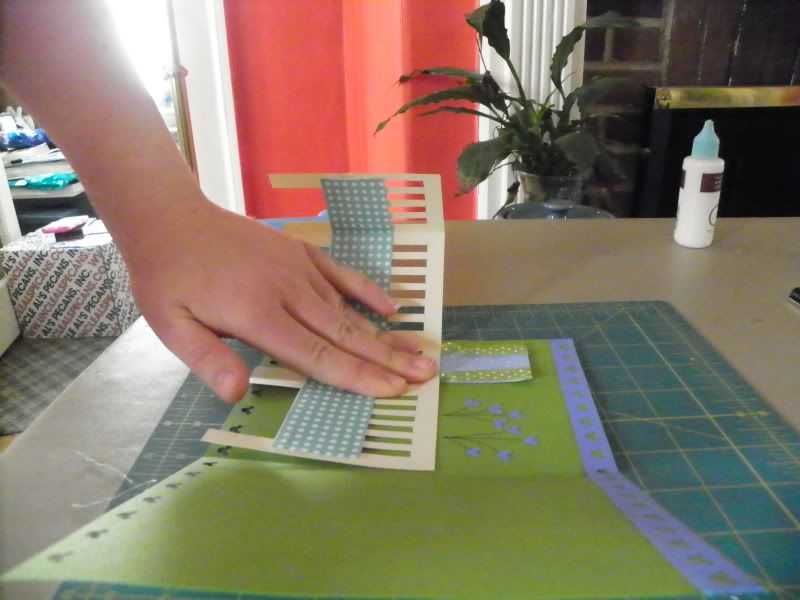
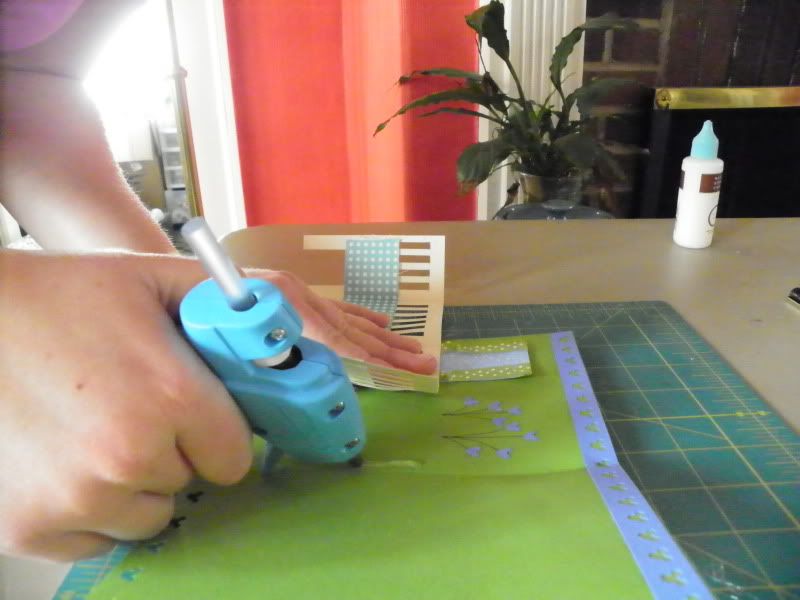
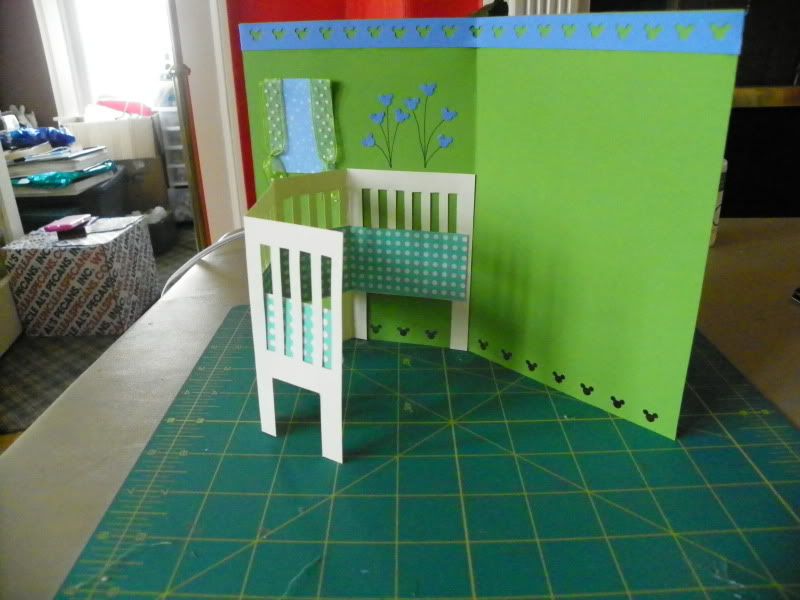
Ok, now glue the other section of the crib to be glued to the card,
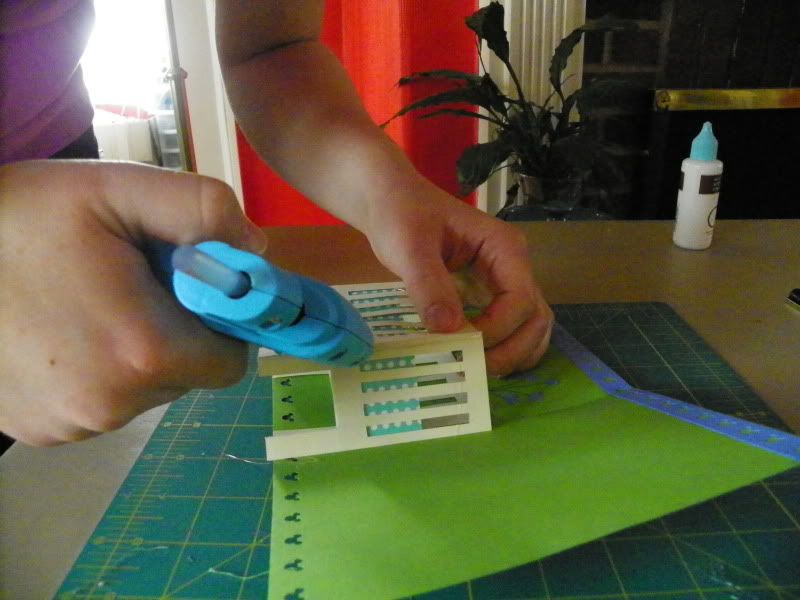
line up the card and press the two together. Voila!
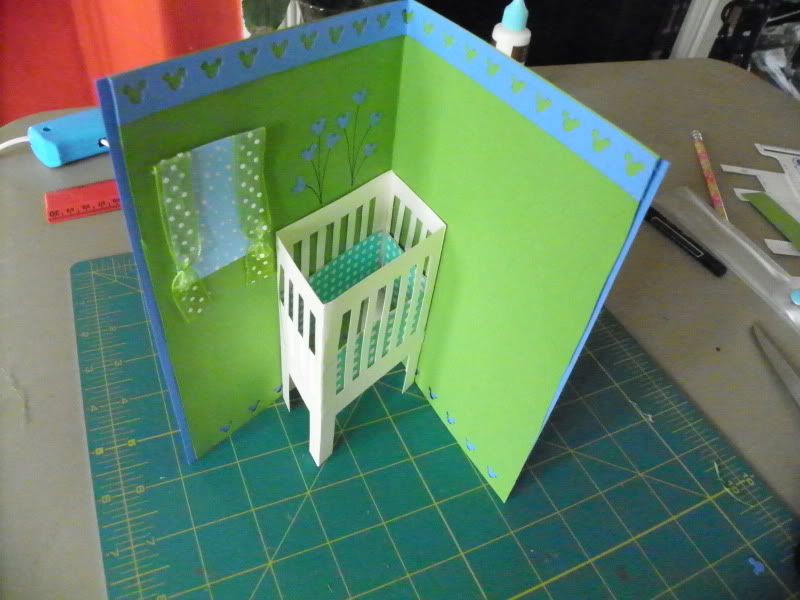
The last step it to glue the inner card to the outer.
This is totally optional, you can just use a card. But if you want to use a decorative punch outn the inner card and have another color show through, you will need the outer card. I like using one cardstock and one paper for the pair, either one can be the inner or outer. If you use 2 pieces of cardstock, it gets pretty heavy- not a problem, but be aware of that. And you may want to trim off any excess outer/inner cards so they line up exactly.
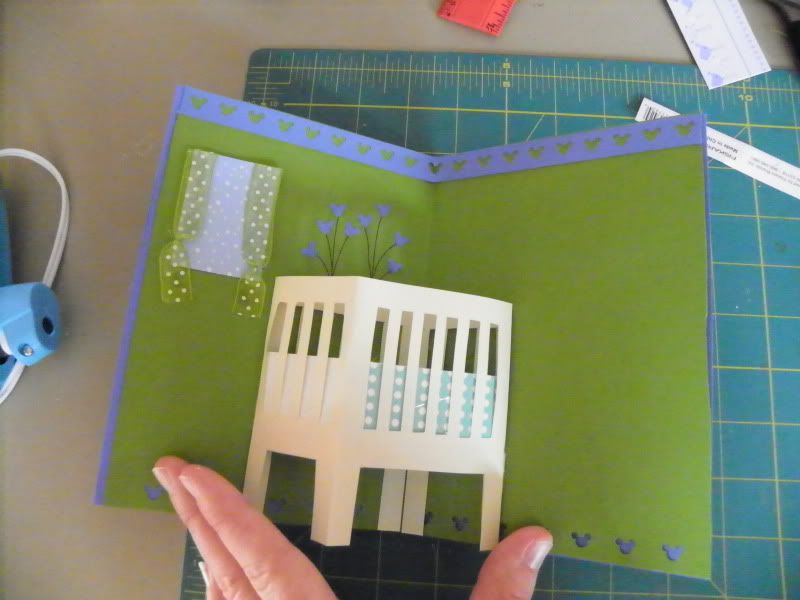
And then decorate the front of the card however you'd like. I went simple with this one and just used a stripe of cute blue prams.
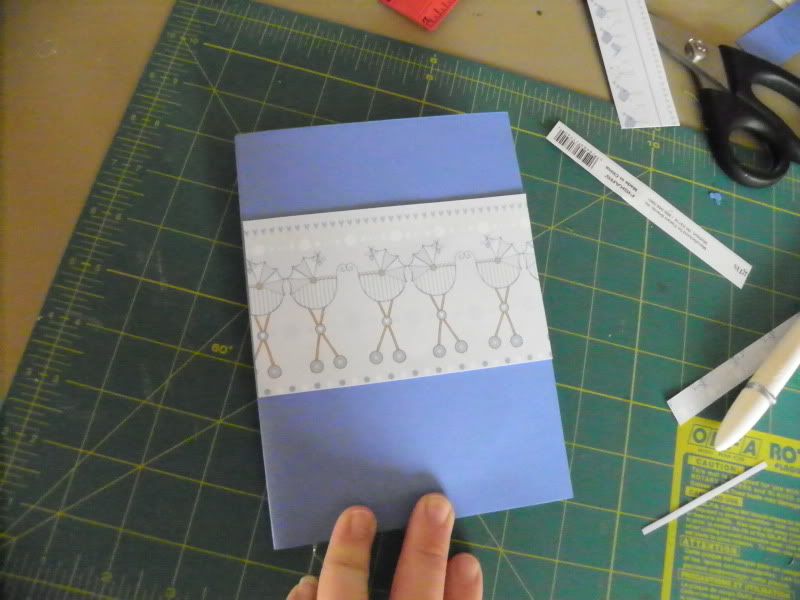
There you have it, how to make your own pop-up crib card. It's not a speedy process, but once you figure it out you can get an assembly line going and it won't take too long. I'll let you know how long my third card takes, after I've figured out all the measurements and don't have to stop to photograph the steps and blog each step as I go.
Monday, March 14, 2011
A vote for Mexican
I recently asked Clint to vote for what we'd have for dinner. He seemed pretty stumped, so I made it easy: pick an ethnicity and pick a meat, I'll pick the recipe.
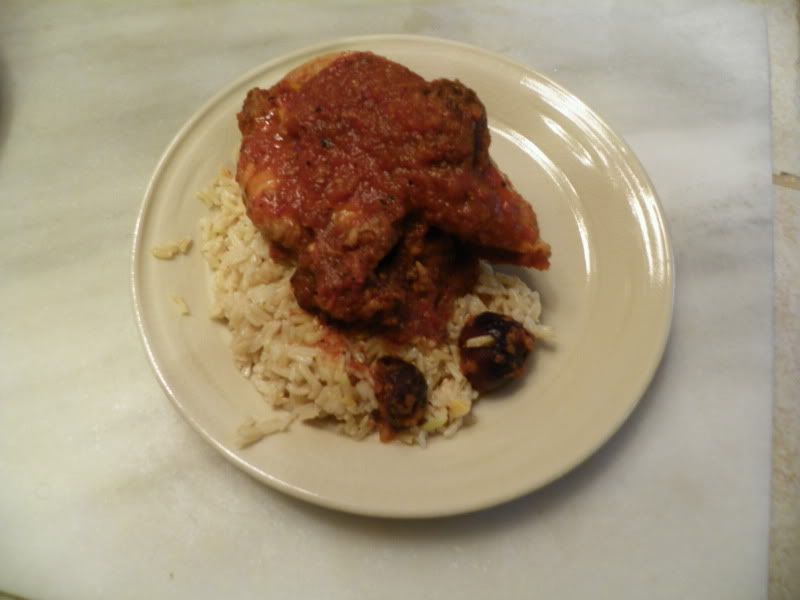
He chose Mexican and chicken, and I chose this Veracruzana-inspired chicken dish from a Light Mexican cookbook I bought in Disney World several years ago (and have never used... I do that too often).
It was good, and relatively easy. The next day, however, I did something I don't often do: I transformed the leftovers into a new dish. Normally I'm perfectly happy with leftovers, but we ran out of brown basmati rice, and chicken served over plain rice doesn't really inspire me, anyway. And I really like pairing corn with Mexican flavors.
So first, Veracruzana-style Chicken Stew with Prunes (or in my case, figs)
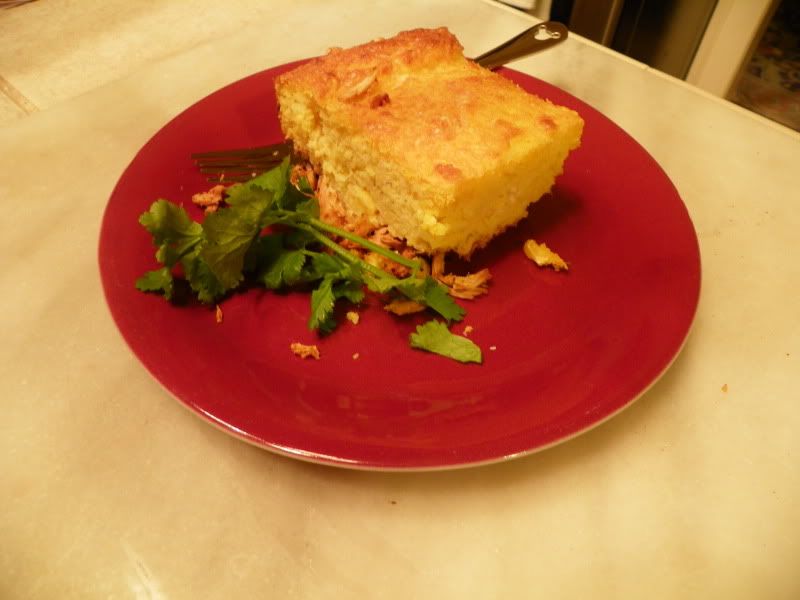
The next day, the chicken was shredded from the bone, mixed with its sauce, and made into Miss Smart's Hot Tamale Spoonbread (which, incidentally, is now my favorite cornbread recipe, I love how soft and moist it is).
Stewed Chicken with Chipotles and Figs
adapted from Mexican Light, by Martha Rose Shulman
My changes were based on the ingredients I had and my desire not to go to the store again.
Note: this recipe has you make fresh chicken stock to use, which is unnecessary for me, since I make it so often, but I wasn't sure how else to cook the chicken if I skipped boiling it and generating stock. So, extra stock. The only downside is this way I didn't have enough time to chill it to skim the fat off the top like I normally would.
2 quarts water
3 lbs of bone-in chicken (I used 4 thighs and 2 split breasts, skin removed)
10 dried Black Mission figs (or 8 pitted prunes)
4 garlic cloves, 2 of them set aside and 2 of them unpeeled and toasted in a frying pan
1 medium onion, cut in half
2lbs tomatoes, halved and roasted (or 28oz of canned tomatoes, drained)
1T canned chipotles in adobo
freshly ground black pepper
pinch ground cloves
1 cinnamon stick
1T oil
First, roast the tomatoes and onion. Line a cookie sheet with foil and place the tomatoes and one onion half on the foil. Set the broiler to high, and broil for a few minutes, flip each tomato and the onion over, and broil for a few more minutes, until they're all lightly charred. Side aside. (If you're using canned tomatoes, just broil the onion alone)
Toast the garlic (this is optional): place the 2 unpeeled cloves in a frying pan and let them toast for a few minutes, moving them around occasionally. Let cool and then peel.
Begin the chicken stock. Place the water, the other onion half, 4 figs and the chicken in a large pot and bring to a boil. Reduce to a simmer and simmer for about 15 minutes. Strain 2.5 cups of the stock (or not...) and set the rest aside (later on, transfer it to tupperware, chill and skim the fat off the top, and use the stock for something else). Also fish out the figs/prunes and have them ready for the next step.
Transfer the roasted tomatoes (or use the drained canned tomatoes), roasted onion half, the toasted garlic, the chipotles, black pepper, cloves, and the figs from the chicken stock to a blender and puree.
Heat the oil in a large pot/dutch oven over medium-high heat. When it's hot, transfer the tomato puree into the pot and stir for about 5 minutes, until it's thickened slightly. Add 1/2 cup of the strained stock and some salt, and cook, stirring occasionally, uncovered, for 20 minutes. Then add the chicken from the stock, the remaining figs/prunes, the cinnamon stick and the remaining strained stock and cook, covered, for about 30 minutes.
Serve chicken and the sauce over rice (rice that can be cooked using the chicken stock you just made... if you need ideas for how to use that stock).
This dish is different from what I think of when I think "Mexican", but different in a surprising and good way. I'd just add more chipotles next time.
Leftover Remix: Stewed chicken with chipotles and figs turned into corn spoonbread.
Inspired by Miss Smart's Hot Tamale Spoonbread
Leftover chicken from the above recipe: I used 1 breast and 2 thighs, but next time I'd add at least another thigh
Cornbread:
2 cups milk
1 cup cornmeal
2 eggs, separated
1 cup of corn kernels, frozen, fresh or canned (drained)
Shred the chicken with two forks (or your hands) and stir together with the sauce. Place in a layer in an 8x8 baking dish.
Make the cornbread:
In your stand mixer, start to beat the egg whites until they form soft peaks. Set aside.
In a medium saucepan, heat the milk until it starts to bubble, then add the cornmeal (if you forget and add them to the saucepan together, that's ok). Cook, stirring continually, until it thickens (a few minutes). Remove from heat.
Whisk the egg yolks and temper them into the milk mixture and stir in the corn. Gently fold in the egg whites and any extra spices you like (I just use salt because the chicken sauce has enough flavor). Pour the cornmeal mixture over the chicken in the pan, and bake at 350F for about 50-60 minutes, until the cornbread is cooked through.
Serve with some chopped cilantro.
I love this dish, I use it pretty often with shredded chicken (which usually only happens when I make crockpot chicken stock and save the chicken meat for something else). I also plan to turn the last 2 thighs from the stewed chicken recipe into a quesadilla, but that's less exciting than corn spoonbread.
Saturday, March 12, 2011
Starve a cold, feed a fever
or... is it feed a cold, starve a fever?
Well, how 'bout I just eat.
When I'm sick (as I am now, sadly), the only thing I really want is pudding. Pudding is tasty, it's soothing on a sore throat, and it's what my mom always used to make me when I was sick as a kid, so it's nostalgic. Mom's recipe is very quick and easy, but tastes so much better than anything in a plastic cup or a little box, which means that a sick person can handle making it.
This time around, I just happened to have a surplus of milk and eggs that I needed to use the day before I got sick, so, having no idea how knocked out I'd be the next day, I decided I wanted some fancy custard. When I needed something cold and soothing the next day, I was very pleased with my pudding decision.
Creme Caramel
from Cooking Light, October 2008
I halved the recipe.
for the custard:
2 cups 2% milk
1t vanilla paste, 2t vanilla extract or 1 vanilla bean (I went with the paste)
1/3 cup sugar
3 eggs
dash of salt
1T heavy cream
for the caramel:
1/2 cup sugar
2T water
For the custard:
Preheat oven to 225F.
In a medium saucepan, combine milk and vanilla and cook over medium heat until tiny bubbles just start to form around the edges. Meanwhile, beat eggs together with 1/3 cup sugar and salt. Once the milk is ready, remove from heat and whisk in a 1/2 cup of the milk mixture into the eggs, then another 1/2 cup and a third 1/2 cup- this is tempering the eggs, making sure they don't scramble when you add the hot milk to them. Add the entire milk mixture to the eggs and whisk until well combined. Set aside to cool slightly.
In a small saucepan, combine the water and 1/2 cup sugar. Stir while the sugar dissolves, then cook over medium-high heat without stirring, until the sugar turns a caramel-y brown.
Spray 5 6oz ramekins (or whatever you have, note the the cooking time will change with larger ramekins) with non-stick cooking spray, arrange on a cookie sheet, and divide the caramel among each dish. Now divide the custard among each cup, and transfer (carefully!) to the oven. Bake at 225F for 2 hours, until they're set. Let the custards cool at room temperature, then refrigerate overnight.
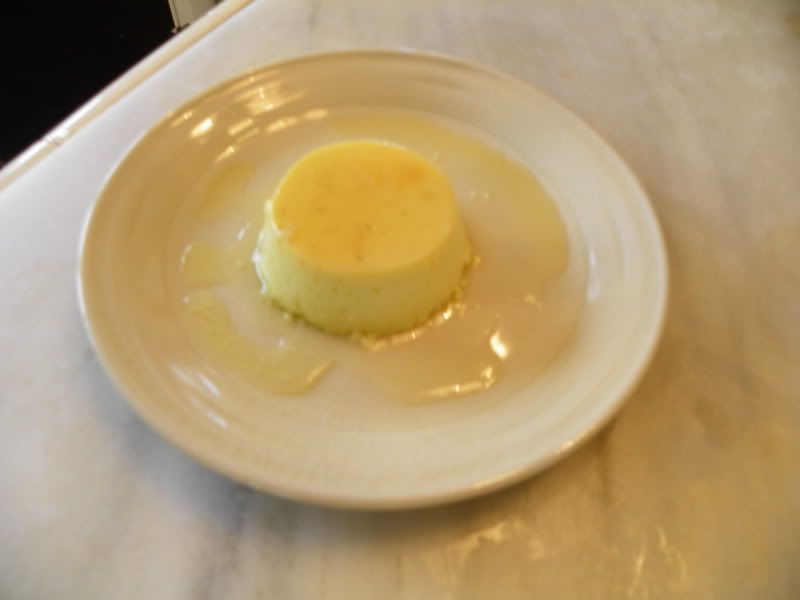
To serve, run a knife along the edge of the ramekin to loosen the custard, and invert on a plate.
This was my first success with creme caramel. I tried it once before, and it was a huge fail- probably because I was too impatient to let it chill overnight and it fell apart when I tried to get the custard out of the dish. I also added chipotle, which I liked, but Clint didn't... at all. So I'm sticking with this Cooking Light recipe! It's so nice and light and soothing on my poor throat, and delicious for non-sick people.
Well, how 'bout I just eat.
When I'm sick (as I am now, sadly), the only thing I really want is pudding. Pudding is tasty, it's soothing on a sore throat, and it's what my mom always used to make me when I was sick as a kid, so it's nostalgic. Mom's recipe is very quick and easy, but tastes so much better than anything in a plastic cup or a little box, which means that a sick person can handle making it.
This time around, I just happened to have a surplus of milk and eggs that I needed to use the day before I got sick, so, having no idea how knocked out I'd be the next day, I decided I wanted some fancy custard. When I needed something cold and soothing the next day, I was very pleased with my pudding decision.
Creme Caramel
from Cooking Light, October 2008
I halved the recipe.
for the custard:
2 cups 2% milk
1t vanilla paste, 2t vanilla extract or 1 vanilla bean (I went with the paste)
1/3 cup sugar
3 eggs
dash of salt
1T heavy cream
for the caramel:
1/2 cup sugar
2T water
For the custard:
Preheat oven to 225F.
In a medium saucepan, combine milk and vanilla and cook over medium heat until tiny bubbles just start to form around the edges. Meanwhile, beat eggs together with 1/3 cup sugar and salt. Once the milk is ready, remove from heat and whisk in a 1/2 cup of the milk mixture into the eggs, then another 1/2 cup and a third 1/2 cup- this is tempering the eggs, making sure they don't scramble when you add the hot milk to them. Add the entire milk mixture to the eggs and whisk until well combined. Set aside to cool slightly.
In a small saucepan, combine the water and 1/2 cup sugar. Stir while the sugar dissolves, then cook over medium-high heat without stirring, until the sugar turns a caramel-y brown.
Spray 5 6oz ramekins (or whatever you have, note the the cooking time will change with larger ramekins) with non-stick cooking spray, arrange on a cookie sheet, and divide the caramel among each dish. Now divide the custard among each cup, and transfer (carefully!) to the oven. Bake at 225F for 2 hours, until they're set. Let the custards cool at room temperature, then refrigerate overnight.
To serve, run a knife along the edge of the ramekin to loosen the custard, and invert on a plate.
This was my first success with creme caramel. I tried it once before, and it was a huge fail- probably because I was too impatient to let it chill overnight and it fell apart when I tried to get the custard out of the dish. I also added chipotle, which I liked, but Clint didn't... at all. So I'm sticking with this Cooking Light recipe! It's so nice and light and soothing on my poor throat, and delicious for non-sick people.
Tuesday, March 8, 2011
Mardi Gras!
Some people want New Orleans cuisine for Mardi Gras, but in our household, with Clint's love of Scandinavia and my actual connection to Scandinavian traditions (as loose as that connection may be), we go for Swedish cuisine.
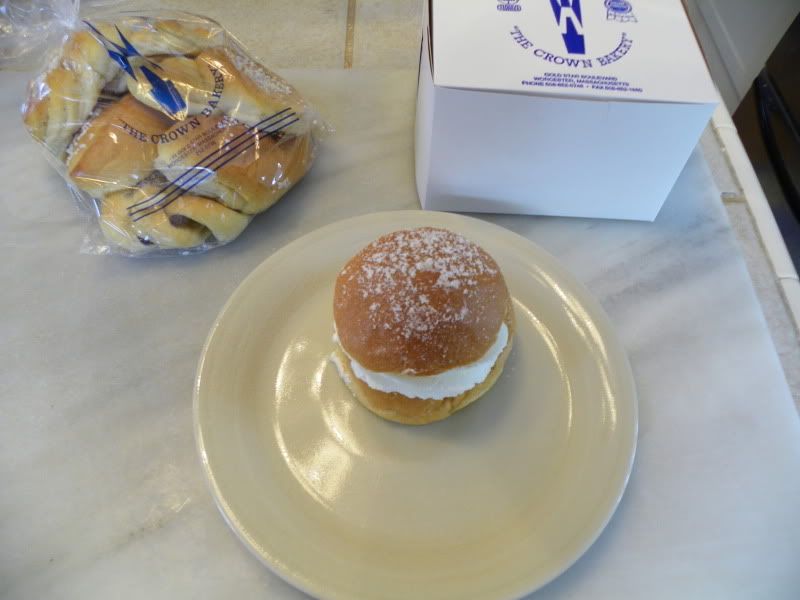
Worcester is home to a number of excellent eateries. One of our more recent discoveries (sad for our taste buds, good for our waistlines) is the Crown Bakery on Gold Star Blvd. The Crown is a Swedish bakery, specializing in all the deliciousness any bakery can provide, but also in a few Scandinavian delicacies. One of these is Semla Buns, or Semlor. Semlor are a traditional/stereotypical Swedish cardamom roll filled with almond paste and whipped cream, and are eaten on Semmeldagen. (I hear another common filling is strawberry)
You can see that Semlor aren't the only things we came away with, I couldn't resist a half dozen cardamom rolls.
Tuesday, March 1, 2011
Mood-improving cookies
Well, friends, since my time of "extended vacation" has begun, I have had more than my fair share of misfortunes. Come on karma, I got laid off, I have no income anymore, and you have to continue to screw me over? Not cool.
Yesterday I was on my way to pilates when I slipped on a short flight of icy steps and fell, hitting each step on the way down. The result is a very sore tailbone. I can't bend over, I can sit on exactly one chair in our house (which is an improvement over yesterday! small victories), and walking is slow and painful. The only thing I can do is go up the stairs. All of this makes me very bitter.
What's worse is that I have so many big things going on this week: a paper due in class today (I totally half-assed writing it yesterday because I was in so much pain, but fortunately it's just a first draft), choir tonight with solo auditions (I certainly can't cough, so can I sing?) and the biggest of all, a breakfast-through-dinner job interview, an hour and 20 minutes away, in two days. I'll walk around campus, sit for 30 minute intervals with various faculty members in their offices, and give an hour-long seminar. I'm scared. I'm scared that I'll be in such pain from trying to sit normally that I'll just break down in the seminar, and I'm worried that if I stock up on painkillers, the fidget-inducing side effect will start in at an unfortunate moment.
So needless to say, I'm in a pretty bad mood. Fortunately, my mom made a new confection I shall call "crack brownies", which do make me feel better. I also discovered a relatively easy but beautiful and delicious cookie recipe that I have made twice since finding it 5 days ago. Mom needs to email me the crack brownie recipe so I can share it here, but let me tell you about these cookies.
These are praline cookies, they are Martha Stewart's Aunt Mary Dillon's Praline Cookies. The cookie base is a very simple and straightforward sugar cookie recipe that I will likely make without the topping. You'll want to slightly underbake them so that they remain chewy in the middle. The topping is very easy, and takes well to whatever nut you have on hand- it doesn't have to be pecans! (note: that's PEE-can, not peh-CAHN. I'm from Connecticut) I found these cookies last week when I was still on the hunt for a new cookie recipe (part 2 of the search that ended in coffee cake). They were included in one of the Martha Stewart cookie slide shows, which are a nice way to quickly view a number of recipes.
Praline Cookies
from Martha Stewart
Cookie:
1/2 cup (1 stick) butter, softened
1 and 1/2 cups brown sugar, packed
1 egg
1t vanilla
1 and 2/3 cup flour
1.5t baking powder
1/2t salt
Cream the butter and sugar together until fluffy. Beat in the egg and vanilla and beat for a few minutes, until that's nice and fluffy.
Sift the dry ingredients together and add to the butter mixture, stirring until combined.
Form small balls (I preferred about 1t of dough) and place on a cookie sheet, with space in between (they'll spread out while baking). Bake at 350F for about 10-12 minutes, until they're just turning golden brown on the edges, and look done but are slightly soft when you touch them. Cool on the baking sheet for a few minutes, then on a rack. Top with praline topping when cool.
Praline Topping
1/2 cup cream (I haven't yet tried my favorite fat free 1/2&1/2 here, but I probably will)
1 cup brown sugar
1 cup powdered sugar
1 and 1/2 cups nuts, chopped (Martha says pecans, I have tried walnuts and hazelnuts- or use a mix!)
In a small saucepan over medium heat, combine the brown sugar and cream. Bring to a boil, stirring occasionally, and then boil (a nice rolling boil) for 2 minutes, stirring constantly. Remove from heat, and whisk in powdered sugar and stir until combined and no lump remains (you can dump it in for sift it in, I'd recommend sifting but dumping is ok, you'll just have to stir more because of the lumps) and stir in the nuts. Drop teaspoonfuls on cookies immediately. If the topping hardens before you've done all the cookies, place back over the burner and stir until the praline melts again.
You'll have leftover praline, which you can drop on a parchment-lined cookie sheet and let harden. This makes a very addictive sugary snack- just try not to eat too many at once, like I did :-/
Subscribe to:
Posts (Atom)