Wednesday, May 25, 2011

wamozart12 sews

That's right friends: she cooks, she knits, she sews! And sewing is the reason why I not only have not been cooking, but why I'm 2 weeks behind on my tv (luckily my DVR still has room to save all the shows I'm not watching, even while it accumulates more)

Sit down, let me tell you a tale.

One day in late April, I was reading the one and only fashion blog I read, What I Wore. If you haven't heard of it, it's a recap of what a 20-something former New Yorker/now Indiana-an wears each day, with her thoughts, reasonings, and sources for all her clothes and the way she pairs them. She has a very fun style, and her pictures (all taken by her husband), are very classic and fun to look through. I am by no means a fashion anything (maybe bordering nightmare from time to time), but I like seeing what she wears.

On that fateful day in late April, I was catching up on my blogs, and Jessica wore this lovely pink plaid dress that is just totally me- so I was very eager to see where she bought it. Lo and behold, she made it. What!? So then I got thinking....

(necessary tangent): in early March, mom and I went outlet shopping. The Garnet Hill store we happened by was in the process of closing, and all their stuff was an extra 50% off. If you're anything like me, the words "Garnet Hill" make you think of this.

Long story short (we were there for well over an hour, our shopping buddies quickly shook their heads in completely non-understanding exasperation and went on to the next store), we bought 5 Lilly Pulitzer duvet covers for the fabric. Mom calculated that a king size duvet has about 21 yards of fabric. Lilly no longer sells fabric, but when she did, it was $20 for 1 yd. These duvets were $52 each.
(the blue pineapple print- totally my shade of blue, right?)

Now, mom, being the avid quilter she is, of course automatically thought of these lovely huge pieces of fabric as quilt backings, or to be used as large squares in the quilt pattern. I thought the same thing, but I have to admit, the idea of taking some of the fabric to my seamstress and having her copy a Lilly dress I already had in pink was right up there, too.

And then Jessica posted her dress.

So I got to thinking. I mean, hey, I'm a good quilter. I've only ever sewn straight line seams, but I've won ribbons for my quilts (VT Quilt Festival as a junior, Big E as a junior and as an adult amateur, and Cornish Fair as an adult amateur), I'm a star at matching points (because I'm so fussy and willing to rip out seams if they're not perfect), and I have a decent amount of experience with fabric and thread and sewing machines.

So I went to Joann's and bought some patterns. People suggested that Jessica's dress was somewhat ambitious, and I should start with an easier project. And I should start with a project using a cheap fabric, not my prized Lilly fabric. So I did. I bought 6 yards of white on white that'd be useful for quilting if the garment thing bombed terribly, 3 patterns (1 easy top, 1 easy dress, and Jessica's dress, Simplicity 2444), and I tried it out.

That evening, I had a simple, white sleeveless top. (Simplicity 2593) Side seams, shoulder seams, a gathered neckline, and binding around all the raw edges. It was simple, it was successful, it was fun.

Then I made a white dress. (Butterick 4443)
(please excuse my awkward pose (using the timer on my camera was kind of frustrating, and of course I'd decide I simply must photograph myself when I don't have anyone to help) and my crazy frizzy summer hair)

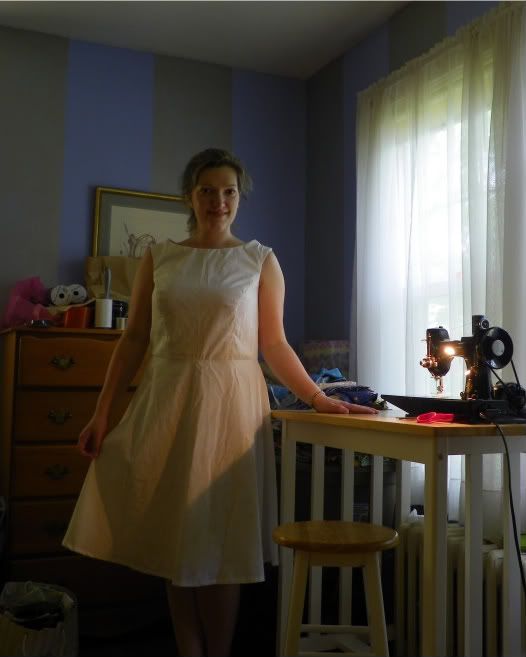
This dress has a lined bodice and a zipper. I did the zipper all by myself- it was kind of a pain but it came out quite well in the end! It's not the most perfect fit, but hey- I've bought $100 dresses that fit worse than this. (the shoulders puff up because they're still pinned, I haven't actually gotten to the hand-sewn bits of this yet)

Then someone said that Joann's had all their Butterick patterns on sale for $1.99 each. So I made a top. (Butterick 5450)

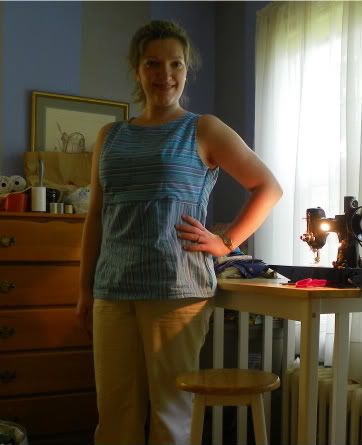
I'm very fond of this top. That day I bought this pattern at Joann's, I also bought fabric to line the white dress. I fully intended to finish the dress when I got home that Thursday, but I couldn't stop myself from playing with these stripes. This top also has a lined bodice. It's very comfortable to wear. I plan to make the dress version, with a few tweaks that I noticed would have improved the fit on this top, but I won't go back and remake the top. It's good enough as is.

And another top. (Butterick 5485)

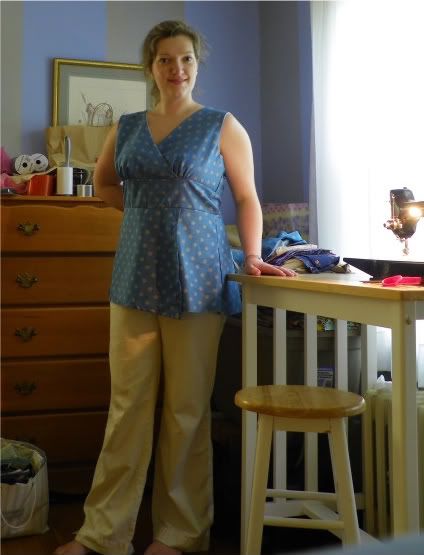
This doesn't have a zipper yet because I don't have a blue zipper. But it was my favorite top to make so far, I think because the lining in the bodice is sewn down as you go- no hand sewing at the very end on this top!

I'm on a roll. I am the crazy sewing lady. Because my sewing machine and table live in the guest room and I have a strict no-tv-in-the-bedrooms policy (although it'd be in our bedroom and not the guest room anyway), I don't watch tv anymore. I don't knit anymore, I don't cook, I just sew.

I'm still deciding what to make next.... I think the dress version of the blue striped top, with a pale blue fabric. I'm still not entirely sure I'm ready for Jessica's dress and my Lilly fabric. Or else one of these...
(Butterick 5490, possibly with a brown floral cotton)
(Butterick 5603, not sure what fabric)

My mom generously gave me a whole stack of fabric that she thought would look great as a garment, so I can't even tell you how much material I have to work with!

And Simplicity patterns are 5 for $5 at Joann's this weekend. :)

Tuesday, May 24, 2011

What's Baking? May: Baking for Mother's Day

This month's What's Baking? theme was chosen by Cara to celebrate Mother's Day. (one nice thing about that is it meant I baked early and didn't have to rush to blog about it!) Originally I wasn't going to bake anything for Mother's Day. We always celebrate it, but this year we left for a week in Disney World at 6:45am the following morning- it was kind of a hectic weekend! Add in the wine tasting fundraiser for my choir 2 days before and.... yeah, I was kind of a basket case.

But then Cara chose the theme, so I decided I did have time to bake, and I would bake something for my mom. (and I'd make a huge batch, since I'd signed up to bring food to the wine tasting)

Mom loves almond. I'm not really sure what her favorite almond sweet is, because she seems to love them all. Add some almond extract and she raves. Give her a can of marzipan and she'll eat it with a spoon. She loves those soft almond cookies from Italian bakeries- and back in the day, I went through a cake-hating phase (a result of too many bakery cakes, I'm really picky about my cake and frosting) and so for my birthday cake each June, my step grandfather would give me a 5lb box of Italian cookies from the Italian bakery a couple blocks from his house. I had my favorites- anything with jelly, and once those were gone, those little thing lace cookies sandwiched around chocolate. I generally ignored the almond ones- ideal for mom! (I also would then hide the cookies away, since there'd be 12 people in the house around the time of my birthday party, and 10 of them would do anything for these cookies. My hiding places never worked all that well.)

But these days, I've changed my mind about almond. Now, this is both good and bad for my mom: I'm more likely to eat up the Italian almond cookies that long ago would be left to her, but on the other hand, I'm also more likely to make almond-flavored goodies.

Like these cookies. These were near the back of the May 2011 Bon Appetit as the "Prep School" feature. I'm not sure what they're really called- in the article they're "Rainbow cookies", but aren't they also called "Italian Flag cookies"? Because they're always red, white and green. Well either way, I saw these and they looked really cute. I loved that they were totally different in ingredients and construction to any other cookie I've made.

And then I noticed they used a can and a half of almond paste. What, these are almond flavored?! I totally never noticed that in the bakery version.

Well anyway, Mom loved them. I loved them. I'm sure the fact that we finished the batch of them 2 weeks ago is why I'm finally losing weight. These are NOT healthy cookies, but they are delicious, and in my mind, worth the calories. (just skip that side of spaghetti at dinner)

Rainbow Cookies
from Bon Appetit, May 2011, page 154
originally from Mario Carbone and Rich Torrisi of Torrisi's Italian Specialties in NYC

Their cookies were red, green and white, I made mine in colors my mom would like: blue, white and purple. (And people were a little scared of the brightly colored layers, I don't really know why. I guess the general public isn't used to the vivid colors gel coloring will give.)

2 cups (yes, 4 sticks. I know.) butter, room temp, cut into 1T pieces
6 eggs, separated
1 and 1/3 cups of sugar, divided
12oz almond paste (not marzipan- I can find both available in the baking aisle at the grocery store, 8oz cans are in the $5-6 range for me- these are not cheap cookies, either)
2 and 3/4 cups plus 1T flour
1/2t salt
gel food colorings
3/4 cup marmalade, warmed and strained (you want the liquid part)
4-6oz bittersweet chocolate, chopped and melted

**3 13x9 baking dishes, preferably metal** If you don't have 3, you'll have to bake in batches. That's what I did.

Note: this recipe requires 2 days to prepare

1. Preheat oven to 350F. Line the baking pans with foil and let the foil overhang the edge (for easy removal). Spray generously with nonstick spray.

2. Beat the egg whites until soft peaks form. Slowly add 1/3 cup sugar and beat until stiff peaks form. Set aside.

3. Beat the almond paste and remaining 1 cup sugar until incorporated (it'll be kind of sandy), 4-5 min with a stand mixer. Increase speed and gradually beat in the 4 sticks of butter. Beat until fluffy.

4. Beat the egg yolks into the almond/butter mixture, then flour and salt. Fold in the egg whites in 2 additions.

5. Divide batter into 3 equal portions (I weighed). Add your desired food colorings to each. Spread each colored batter in one prepared baking pan. Bake 9-15 min (recipe said 9-11, I needed more like 15-18), rotating halfway through, until just begin to turn golden on the edges. Let cool in pans.

6. Layering: spread (I used a brush, an offset spatula would work ok, too) half the marmalade liquid over the color cake you want on the bottom. Using the foil, lift the next layer out of the oven and invert on top of the bottom layer. Peel off the foil and spread that next layer with the remaining marmalade. Lift the third layer out of the pan and invert onto the 2nd layer- leave the foil on this time. Place the 3 stacked cakes on a slightly large cookie sheet/jelly roll pan and place another cookie sheet/jelly roll pan on top and weight it down with some cans. Refrigerate overnight. This is to smoosh the three layers together so they won't separate when you cut.

(I weighed the cakes down with the fridge items that normally live on the shelf where I put the cookies sheets/cookie layers, thus saving space in the fridge :) )

6.2: yes, you really do want to weight it down overnight.

7. The next morning, bring the cookie layers out on the counter. Remove the top cookie sheet and that top layer of foil, and spread with half the melted chocolate (I melted in the microwave at 15-30 sec intervals). Place back in the fridge for about 30 min to harden. Remove the cookie layers again, invert onto that top cookie sheet and peel the foil off the bottom layer. Spread the remaining chocolate on the bottom, and put back in the fridge to harden.

8. Cut the cookies. I used a long straight knife to cut. First trim the edges (these are the ugly bits you get to eat right away!) and them cut strips about 1.5-2in wide. Then cut each row into cookie slices, ideally about 1/2in wide. The recipe says you should be able to get 96 cookies. I probably did.

I would have also loved to coat each side of the cookie strips with chocolate, but I didn't have time. that would mean that each individual cookie would have the 4 thinner sides coated with chocolate, which would be prettier.

I also had a problem with some of the cookies separating after cutting them. It wasn't too bad, but I wonder if that was in a corner not weighted down well enough.

All in all, these were delicious, and very fun to make- not quick by any means, but definitely worth the wait. They have a nice almond flavor that's apparent but not overpowering (like those soft Italian almond cookies can be) and the texture is very different- soft, but much denser than even a pound cake. My next batch will be pink, white and green for my birthday.

Monday, May 23, 2011

wamozart12 gets healthy!

Alternate title: wamozart12 lost 3lbs after not losing anything for months and can't stop raving about it!

What's my secret, you ask? An hour a day on the elliptical. Yeah, I bet you wish I had some awesome secret, but no, it's just exercise.

I'm also eating healthier. I don't calorie count anymore because limiting and depriving myself just makes me bitter and short-tempered. I'm baking less, and yes, I really do miss cookies, and trying to eat more vegetables.

All in all, this is just me making excuses for not updating my blog- because I haven't really been cooking much. But here was a nice, quick, healthy dinner. I'm not sure where the pictures went, but it wasn't the prettiest dinner anyway!

Hoisin-Ginger-Glazed Shrimp Skewers
adapted from Everyday Food, June 2011

raw, thawed shrimp, shells removed but tails left on
1 zucchini, cut into disks
sugar snap peas
2 small onions, peeled and quartered
bamboo skewers, soaked in water

1/4 cup hoisin
1T soy sauce
1T rice vinegar
1T freshly grated ginger

Mix the last four ingredients together in a small bowl, set aside.

Put everything else on skewers (I like to have skewers contain all one item, so that they cook properly- i.e. shrimp cook much faster than onions). Brush with the sauce and grill, either on a proper grill or a grill pan. Grill till done (shrimp are about 4 min, until they're pink, and the veggies will take longer).

Serve with some brown rice or plain rice noodles. Mmm, healthy! Also quite delicious, this recipe will definitely pop up a few times on my table this summer.

Friday, May 20, 2011

Maple roasted sweet potatoes

One night, I went into the kitchen to make dinner. I was planning to make simple baked sweet potatoes (which I love topped with ricotta, but this particular night they'd just be plain) and lo and behold, Claire Robinson was making a 5 ingredient fix of sweet potatoes. Perfect! She pureed hers, but I left mine in cubes. They were ridiculously good, each of us had 2 servings.

Maple Roasted Sweet Potatoes
adapted from Claire Robinson
Serves 4, unless you really love maple and sweet potatoes, then serves 2.

2 sweet potatoes/yams, peeled and diced (1/2inch cubes)
4T maple syrup, divided (3T and 1T)
3T olive oil
salt and pepper to season
1 large onion, cut into thin slices
1T butter

Toss the cubed sweet potatoes with 3T maple syrup, 2T olive oil and season with salt and pepper. Spread on a foil-lined (for easy clean-up) baking sheet and bake at 400F for about 45 minutes. Toss them gently around a bit every so often to keep them from sticking to the foil.

Meanwhile, place the remaining 1T olive oil and the butter in a large frying pan over medium heat. Add the sliced onion and cook for a few minutes, until the onion begins to soften. Add the remaining 1T maple syrup to help speed up the caramelization and cook a few minutes more (about 10 min total).

Serve the sweet potatoes topped with the onions.

I think we may have found a new favorite method of preparing sweet potatoes.

Claire's way was to puree the sweet potatoes after they come out of the oven with half the onions, and then top with the remaining onions, but I like the roasty edges of the potato cubes. Plus I hate washing my food processor.

Tuesday, May 17, 2011

Pate that's not scary

People are definitely pretty leery of pate. "ew liver gross!" But my friends, I must say (as a recent convert myself), pate can be delicious. (thanks to M and R for ordering that charcuterie board at Russell Tavern in Harvard Square and showing me how delicious and not scary pate and rillettes are.)

So for those of you who still shy away from anything involving liver, here's a pate recipe. And guess what, it's vegan. Totally not scary, full of normal ingredients you probably already have in your pantry.

I found this recipe in Jane Green's newest novel, Promises to Keep. I was totally surprised when at the end of chapter one, in which this certain almond cake is mentioned over and over again, in a way that kind of seemed odd, there was a recipe for that same almond cake. Each chapter had a recipe- what a pleasant surprise!

This recipe was made by a vegan and devoured by her dog. All the characters were greatly disappointed because the pate was so delicious- so obviously I had to try it.

Mushroom and Walnut Pate
recipe provided by Jane Green

2 cups dried mushrooms, soaked for a while and water drained and discarded
1 cup fresh mushroom (I used baby bellas)
2 onions, diced
3 garlic cloves, chopped
2T olive oil
3/4 cup walnuts or pecans, toasted
1/2 cup fresh parsley
1 and 3/4 cup panko bread crumbs
3T tahini
2T hoisin
3T tamari soy sauce (I used plain soy sauce, my grocery store is somewhat limited)
1t dried oregano
1/2t dried sage

In a large frying pan, saute the onions, garlic and mushrooms with the olive oil for 7-8 minutes over medium heat. Let cool slightly, then puree in a food processor, along with the parsley and walnuts.

Place in a bowl and add the remaining ingredients. Stir to combine, cover and refrigerate overnight. Season with salt and pepper as desired (I found it needed no salt, and I added a few grinds of black pepper).

Serve cool or at room temperature with plain crackers or sliced baguette.


When I brought this to our wine tasting, I made a sign- it looks suspiciously like liver pate, and I didn't want people to get scared off. Plus I thought any vegan/vegetarian guests might enjoy having something they knew would work with their diet. My pate ended up being one of the most popular dishes!

Sunday, May 15, 2011

More ham!

These biscuits used to be one of my cocktail party staples. They're quick and easy, and delicious. But alas, after a while every one of my friends had had them, and while they were still popular, I wanted to branch out.

This past weekend my choir held a wine tasting and silent auction party thing as their annual fundraiser, and as usual, I volunteered to make food. Once the time came to actually make the food, I had way more on my plate than I expected (my final project for my teaching class was due the same day). And since I had all that ham, I pulled out this old favorite- there's nothing like a familiar easy recipe when you're already stretched too thin.

Ham and Cheese biscuits
adapted from Giada

2 cups flour
1T baking powder
1t baking soda
1/2 t salt
6T butter, cold and cut into cubes
3/4 cup buttermilk
1/4 cup diced ham
1/2 cup grated cheese (I used swiss, gruyere would be great)

In a bowl, whisk together the flour, baking powder, baking soda and salt. Add in the butter and beat until the mixture resembles a coarse meal (using the food processor for these 2 steps is probably the easiest- but again, I really hate washing my food processor, so I just use my stand mixer). In a bowl (same bowl if you're using your mixer, or switch to a bowl if you've been using your food processor), add in the buttermilk, ham and cheese and mix until just combined-don't overmix!

Roll out dough to 1/2in thick and cut with a round cookie cutter (mine was about 1.5in in diameter). Bake at 425F for 10-12 min, until just golden brown. Best served warm.


So at the choir wine tasting these weren't the most popular thing.... but they were accidentally placed on the dessert table, which may have been part of the problem. I think Clint could have happily eaten the whole plate.

Friday, May 13, 2011

Spiced Poached Apples

Tonight's dessert is brought to you by Dorie Greenspan.

I made dinner one night instead of going out. At the time, we didn't have much in the way of desserts, aside from leftover Easter candy (somehow, sitting at the dining table after slaving away to make dinner, and eating half a hollow chocolate bunny didn't seem to fit), so I decided to flip through the dessert section of Around my French Table.

This poached apple recipe was pretty easy, and as desserts go, pretty healthy. Yes, it's full of sugar, but there's no fat at all, and the start is a piece of fruit. I dressed it up by adding 1/2lb of kumquats I'd purchase a few weeks ago and had no idea how to use- since we were going away a few days after this, I decided I'd better use them up now rather than risk letting them go back while I was gone.

Clint said this was too sweet for him, but I really enjoyed it. I can't decide if I like it better hot or cold, though- which means it might be a nice dessert for a hot summer evening.

Dorie's Poached Apples
from Around my French Table, page 396

1/2 cup honey
1/3 cup sugar (maybe reduce this to 3T)
3 cups water
zest and juice from 1/2 orange (cut the zest into long strips)
zest and juice from 1/2 lemon (cut the zest into long strips)
3 pieces star anise
1 cinnamon stick (2in long)
vanilla bean (I used 1/2t vanilla paste)
3 medium apples or pears, peeled, cored and cut in half

In a medium saucepan, combine the honey, sugar, water, orange, lemon, anise and cinnamon. Bring to a boil over medium-high heat and then reduce to medium-low and cook for 5 minutes. Add the apples and bring to a simmer. Cook for 10-15 min, until the fruit can be pierced easily with a knife- check its progress as it goes, different varieties of apples/pears may cook more quickly.

Remove the fruit once it's done, and boil the syrup for 10 min more. Pour the syrup over the fruit and let cool. Serve warm, at room temperature or cold.

I think I'd love this with a small slice of spiced pound cake or angel food cake.

Monday, May 9, 2011

Ham!


Have you ever seen the Iron Chef: America Battle Ham episode? The way the chairman's nephew says "ham!" is hilarious. "Haa-aaa-aaaammm!" There's no way I can convey it in text, but the title of this post imitates him.

Like most people, we had an abundance of ham after Easter. So of course I had to figure out what to do with it. My biggest success was chicken cordon bleu.

Chicken cordon bleu and I have a long, lovely history together. In middle school, when Pace opened up in our area (later becoming Sam's Club), we went and marveled at the sheer quantity of random groceries. My 13 year old self indulged in Barber's frozen prepared chicken cordon bleu, and took much joy in popping one in the oven on night my parents made my most hated meal, stuffed bell peppers.

In the past few years, I've indulged in these here and there, but once I had my cousin Rich's chicken cordon bleu (doused in an amazing (and amazingly fattening) bechamel sauce I couldn't really go back to the Barber ones.

Well, we had ham, we had frozen chicken, and we just happened to have swiss cheese. Obviously I had to make chicken cordon bleu.

Chicken Cordon Bleu
adapted from Tyler Florence's recipe

4 chicken breasts, sliced in half horizontally and pounded to flatten a bit.
4 slices of ham (prosciutto would be good, too), each cut in half
about 1/2 cup grated swiss cheese
2T flour
1/2 cup panko
1/2t thyme
1t olive oil
1 egg

Preheat oven to 350F. Spray an 8x8 baking pan with nonstick spray.

Beat the egg in a bowl, set aside. In another bowl, whisk together the flour, panko, thyme, olive oil, and season with salt and pepper.

Place a piece of ham on top of each chicken breast. Sprinkle as much swiss cheese as you like on top of the ham. Roll up the chicken, and secure each roulade with a toothpick.

Dunk each roulade in the egg, then the breadcrumb mixture. Place in the baking pan, and bake for 45 min, until chicken is fully cooked.


These are really good, even as leftovers. I think I may try to bring more ham into my kitchen, just so I can make these again.

Saturday, May 7, 2011

Derby Day!

Since my Kentucky trip, I have a new appreciation for the Kentucky Derby, a day that the rest of my family looks forward to all spring. This year, not only do I plan on watching, but I have to drink a mint julep (or two!) to celebrate. But being a relatively new recruit, and a very new bourbon drinker, I am by no means an expert on the famed mint julep.

So I made up my own.

The Lazy Girl's Mint Julep
a wamozart12 original
serves 4

Ingredients:
1/2 cup bourbon
3-4T simple syrup
1 peppermint tea bag
shaved ice
sprigs of mint, for garnish

Tear open the tea bag and dump the leaves into a bowl. Add the bourbon. Let steep for a while- 20 minutes is pretty good.
Strain off the leaves and add simple syrup to taste.

Fill 4 old fashioned glasses (unless you're fancy and own a julep cup) with crushed or shaved ice. Pour 1oz (2T) of liquid into each glass. Garnish with mint.


You wouldn't think a peppermint tea bag would have anything to do with bourbon. But you'd be mistaken. This was a total half-assed attempt at a drink, and Clint and I were both pleasantly surprised by the results- enough to blog about it!

Happy Derby Day!

Monday, May 2, 2011

Take-out at home, II

As I've mentioned before, I have had my share of Japanese take out. Once I grew up enough to realize fast food wasn't really good food, I started requesting take out from the nearby Japanese restaurant. My parents and I would usually order 2 dinners to share among the three of us, each dinner came with a salad, shrimp and veggie tempura, a potato dumpling and the entree. Usually we'd order one beef negimaki and one chicken teriyaki. For 2 adults and one teenaged girl with a healthy appetite, it was plenty of food, and it was always delicious.

Since I started liking sushi, I usually ignore the cooked entrees at Japanese restaurants- or else we're there for a hibachi meal. I haven't had beef negimaki for a long, long time, but when I was rooting around in the freezer one day (actually, looking for ground turkey for those asian-inspired turkey meatballs, and failing at that), I discovered we had a pound of flank steak. Somehow, I thought of beef negimaki.

I added my own spin- mostly based on the ingredients we had. I wrapped the beef around blanched asparagus instead of scallions. The results were good. The results were even better the second time I made this and use both scallions and asparagus.

Beef Negimaki
recipe adapted from Gourmet, found via epicurious.com.

1lb flank steak
6 asparagus stalks
6 scallions
1/4 cup mirin
2T white wine
2T rice vinegar
3T soy sauce
2t sugar

Blanche the asparagus and scallions: bring water in a medium saucepan to a boil, and add the asparagus. Boil, covered, for 3 minutes, then add the scallions and boil for 2 minutes. Drain the water and set the veggies aside.

Prepare the meat: thinly slice the steak- very thinly! Cut long strips of meat, against the grain. Then line them all up on the cutting board, cover with plastic wrap, and pound with a meat mallet to very, very thin, about 1/16 in thick. (Note: the first time, I was lazy and ignored this step- don't!! The meat won't cook if it's too thick. Better to pound the meat now than have to unroll it later and recook it.)

In a shallow dish (pie dish works nicely), combine the rest of the ingredients (mirin, wine, vinegar, soy sauce and sugar) and whisk together.

Line up some beef strips on your board, enough that when the strips go side-to-side, there are enough lined up, up and down, that the asparagus and scallions will lay down (up and down direction) on beef and not board. Roll each piece of beef around 2 asparagus stalks and 2 scallions, and secure each piece with a toothpick. What you're left with kind of looks like a kebab of beef on asparagus/scallion. Repeat with the rest of the beef and veggies, then place each of this "kebabs" in the dish with the marinade. Marinade for 20 minutes, turning every few minutes or spooning the marinade over the kebabs.

Spray a large frying pan with non-stick spray and heat to medium-high heat. Remove the beef "kebabs" from the marinade and let drip off, then add them to the pan and cook for 3-4 min on each side, until they're cooked through and have a nice sear on them. Place on a clean cutting board and cut through the veggies between the individual pieces of meat, so you have individual rolls (the same way maki sushi are cut). Now pour the marinade into the hot frying pan, and cook for a few minutes, until the sauce is thick and syrupy.

Serve the negimaki with the sauce drizzled over them. Serve with sushi rice.

These are quick, and the sauce is strangely addictive. I've modified it to suit my own pantry, if you actually have sake on hand, use 1/4 cup sake in place of the rice vinegar and white wine. I'm sure the flavor is changed, but my version is still delicious.


The other part I loved about all our Japanese take out was the salad dressing. I'm not sure if this is a traditional thing, or some Americanized take on Japanese flavors, but whatever Japanese restaurant you go to, there's always some sort of delicious gingery salad dressing. I was fortunate enough to find a copycat version of the Benihana salad dressing, which is the restaurant that started it all for me. It was my absolute favorite restaurant. Imagine- a 4 year old wamozart, ordering her Japanese meal in Japanese- thanks to my dad and all his business trips- and using chopsticks without the rubber band and rolled-up paper all the other kids need. (by now I've completely forgotten all the Japanese dad taught me, but I'm sure he still remembers some of the more common words. I'm also less good with chopsticks lately, which is embarassing). I miss Benihana, and I'm glad there are so many other great Japanese restaurants around. (I'm also kind of glad I have that golden childhood memory and I can't go to Benihana as an adult and possibly spoil the memory.)

Benihana Copycat Salad Dressing
adapted from the secret recipe blog

1/2 cup minced onion
1/3 cup rice vinegar
2T water
2T ginger, minced
2T celery, minced
2T ketchup
2T soy sauce
2t sugar
2t lemon juice
1 clove garlic, minced
1/4 cup olive oil

Place all the ingredients except the oil in a blender. Blend until pureed. Drizzle in the oil while the blender's running. Store in the fridge!

The first time I made this, I omitted the celery- I didn't have any. This was a big mistake! Something about the celery really mellows out the onion and garlic flavors, and without the celery, the onion's just too strong. I'm surprised by how much better it was once I added the celery.

This is the kind of dressing I'll make in large batches and keep on hand. We're eating much more salad because of this dressing!