But then Cara chose the theme, so I decided I did have time to bake, and I would bake something for my mom. (and I'd make a huge batch, since I'd signed up to bring food to the wine tasting)
Mom loves almond. I'm not really sure what her favorite almond sweet is, because she seems to love them all. Add some almond extract and she raves. Give her a can of marzipan and she'll eat it with a spoon. She loves those soft almond cookies from Italian bakeries- and back in the day, I went through a cake-hating phase (a result of too many bakery cakes, I'm really picky about my cake and frosting) and so for my birthday cake each June, my step grandfather would give me a 5lb box of Italian cookies from the Italian bakery a couple blocks from his house. I had my favorites- anything with jelly, and once those were gone, those little thing lace cookies sandwiched around chocolate. I generally ignored the almond ones- ideal for mom! (I also would then hide the cookies away, since there'd be 12 people in the house around the time of my birthday party, and 10 of them would do anything for these cookies. My hiding places never worked all that well.)
But these days, I've changed my mind about almond. Now, this is both good and bad for my mom: I'm more likely to eat up the Italian almond cookies that long ago would be left to her, but on the other hand, I'm also more likely to make almond-flavored goodies.
Like these cookies. These were near the back of the May 2011 Bon Appetit as the "Prep School" feature. I'm not sure what they're really called- in the article they're "Rainbow cookies", but aren't they also called "Italian Flag cookies"? Because they're always red, white and green. Well either way, I saw these and they looked really cute. I loved that they were totally different in ingredients and construction to any other cookie I've made.
And then I noticed they used a can and a half of almond paste. What, these are almond flavored?! I totally never noticed that in the bakery version.
Well anyway, Mom loved them. I loved them. I'm sure the fact that we finished the batch of them 2 weeks ago is why I'm finally losing weight. These are NOT healthy cookies, but they are delicious, and in my mind, worth the calories. (just skip that side of spaghetti at dinner)
Rainbow Cookies
from Bon Appetit, May 2011, page 154
originally from Mario Carbone and Rich Torrisi of Torrisi's Italian Specialties in NYC
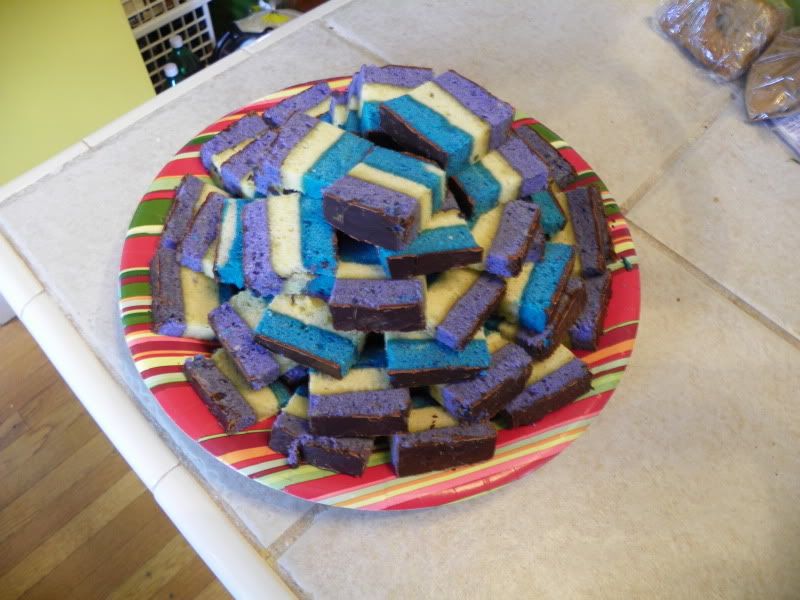
Their cookies were red, green and white, I made mine in colors my mom would like: blue, white and purple. (And people were a little scared of the brightly colored layers, I don't really know why. I guess the general public isn't used to the vivid colors gel coloring will give.)
2 cups (yes, 4 sticks. I know.) butter, room temp, cut into 1T pieces
6 eggs, separated
1 and 1/3 cups of sugar, divided
12oz almond paste (not marzipan- I can find both available in the baking aisle at the grocery store, 8oz cans are in the $5-6 range for me- these are not cheap cookies, either)
2 and 3/4 cups plus 1T flour
1/2t salt
gel food colorings
3/4 cup marmalade, warmed and strained (you want the liquid part)
4-6oz bittersweet chocolate, chopped and melted
**3 13x9 baking dishes, preferably metal** If you don't have 3, you'll have to bake in batches. That's what I did.
Note: this recipe requires 2 days to prepare
1. Preheat oven to 350F. Line the baking pans with foil and let the foil overhang the edge (for easy removal). Spray generously with nonstick spray.
2. Beat the egg whites until soft peaks form. Slowly add 1/3 cup sugar and beat until stiff peaks form. Set aside.
3. Beat the almond paste and remaining 1 cup sugar until incorporated (it'll be kind of sandy), 4-5 min with a stand mixer. Increase speed and gradually beat in the 4 sticks of butter. Beat until fluffy.
4. Beat the egg yolks into the almond/butter mixture, then flour and salt. Fold in the egg whites in 2 additions.
5. Divide batter into 3 equal portions (I weighed). Add your desired food colorings to each. Spread each colored batter in one prepared baking pan. Bake 9-15 min (recipe said 9-11, I needed more like 15-18), rotating halfway through, until just begin to turn golden on the edges. Let cool in pans.
6. Layering: spread (I used a brush, an offset spatula would work ok, too) half the marmalade liquid over the color cake you want on the bottom. Using the foil, lift the next layer out of the oven and invert on top of the bottom layer. Peel off the foil and spread that next layer with the remaining marmalade. Lift the third layer out of the pan and invert onto the 2nd layer- leave the foil on this time. Place the 3 stacked cakes on a slightly large cookie sheet/jelly roll pan and place another cookie sheet/jelly roll pan on top and weight it down with some cans. Refrigerate overnight. This is to smoosh the three layers together so they won't separate when you cut.
(I weighed the cakes down with the fridge items that normally live on the shelf where I put the cookies sheets/cookie layers, thus saving space in the fridge :) )
6.2: yes, you really do want to weight it down overnight.
7. The next morning, bring the cookie layers out on the counter. Remove the top cookie sheet and that top layer of foil, and spread with half the melted chocolate (I melted in the microwave at 15-30 sec intervals). Place back in the fridge for about 30 min to harden. Remove the cookie layers again, invert onto that top cookie sheet and peel the foil off the bottom layer. Spread the remaining chocolate on the bottom, and put back in the fridge to harden.
8. Cut the cookies. I used a long straight knife to cut. First trim the edges (these are the ugly bits you get to eat right away!)
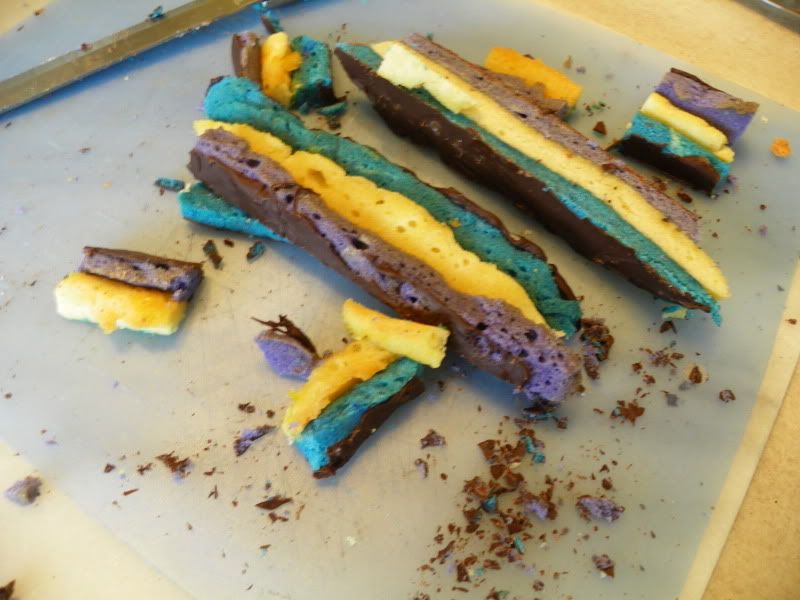 and them cut strips about 1.5-2in wide. Then cut each row into cookie slices, ideally about 1/2in wide. The recipe says you should be able to get 96 cookies. I probably did.
I would have also loved to coat each side of the cookie strips with chocolate, but I didn't have time. that would mean that each individual cookie would have the 4 thinner sides coated with chocolate, which would be prettier.
I also had a problem with some of the cookies separating after cutting them. It wasn't too bad, but I wonder if that was in a corner not weighted down well enough.
All in all, these were delicious, and very fun to make- not quick by any means, but definitely worth the wait. They have a nice almond flavor that's apparent but not overpowering (like those soft Italian almond cookies can be) and the texture is very different- soft, but much denser than even a pound cake. My next batch will be pink, white and green for my birthday.
1 comment:
Just saw this post from last month's What's Baking while I'm baking up this month challenge! Great job! Rainbow cookies are a must have! Enjoyed the recipe and love your color choice! One of my family's favorite cookies!
Post a Comment